Applet: Andrew Adams, Nora Willett
Text: Marc Levoy
In our first optics applet we introduced Gauss's ray diagram, and in our second applet we considered the relationship between the sizes of things in object space (in the scene) and image space (on the sensor). This led us to talk about depth of field - the topic of this applet.
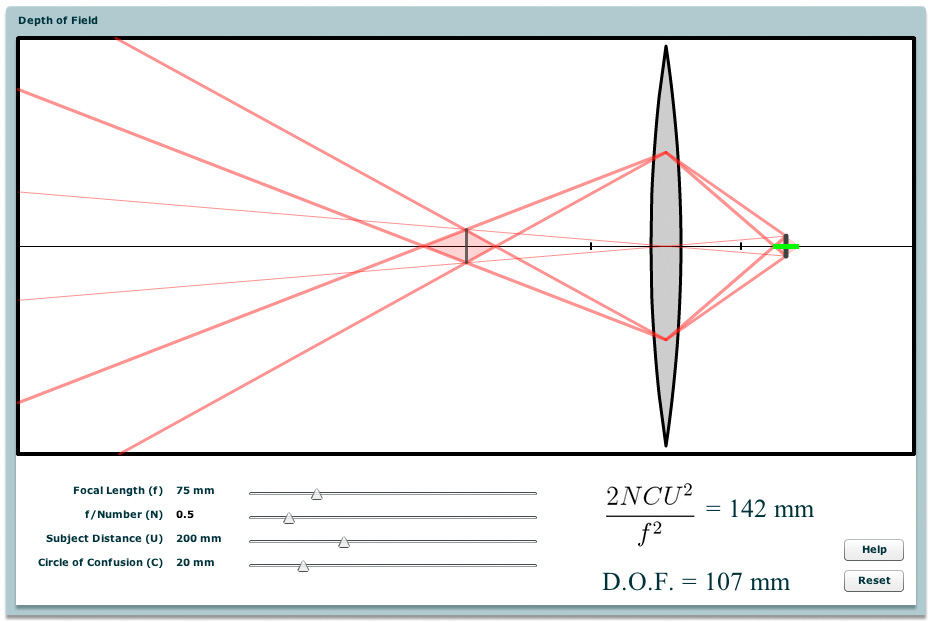
When you move the sensor in a digital camera relative to the lens, the plane in object space that is sharply focused moves as well. How far can you move the sensor before a sharply focused feature goes out of focus? To answer this question, we must first define what we mean by "out of focus". The standard definition is that the width of the blurred image of the feature has become larger on the sensor than some maximum allowable circle of confusion. This size of this circle is arbitrary, but a reasonable choice is to make it equal in diameter to the width of a pixel. The thick black vertical bar at the right side of the applet above represents one circle of confusion.
|
|
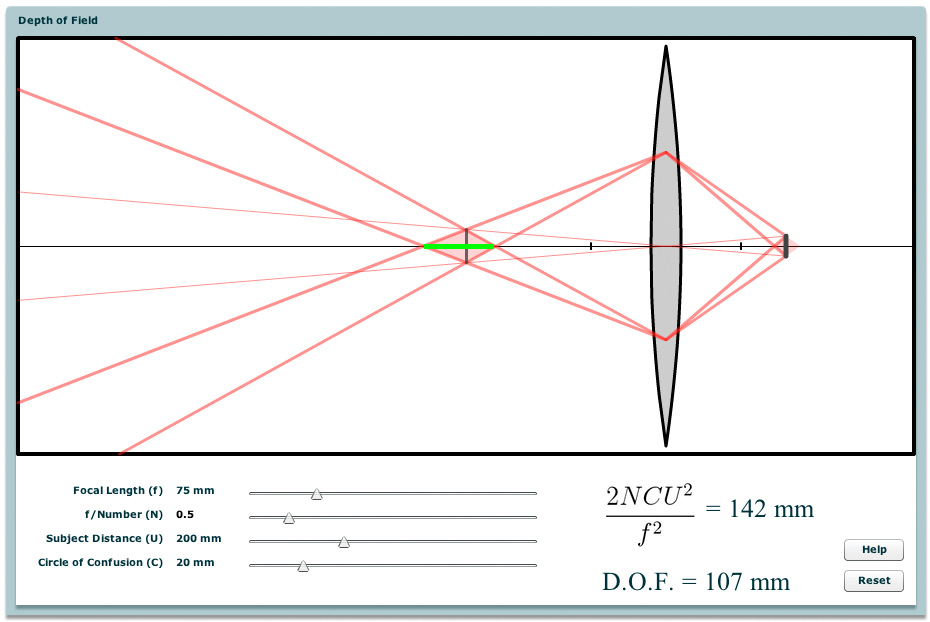
Once we've established this metric, it's easy to see that objects coming to a focus too far in front of or behind this circle (too far to the left or right of this bar on the applet) will have spread out to a size larger than the circle when they strike the sensor. Now look at the dark red construction lines drawn on the applet. These lines connect the edges of the lens aperture (horizontal purple bars lying athwart the lens) to each side of the circle of confusion. A moment's examination of the lines will convince you that "too far" means outside the pink-shaded diamond lying astride the bar. The width of this diamond, which is really a distance along the optical axis, is called the depth of focus for this optical arrangement. To avoid confusion we've drawn the depth of focus in green on the snapshot at left. |
Applying Gauss's ray construction, we can compute the position in object space that corresponds to the circle of confusion in image space. We've drawn this as a second, thinner vertical black bar on the applet. We say that these two vertical bars are conjugates. Note that the height of the two bars are different. These heights are related to one another by the lateral magnification of the lens, and can be computed from one another using the light red lines that pass through the center of the lens and strike the endpoints of the bars.
|
Repeating on the object side of the lens the same construction of dark red lines we drew on the image side, we form another pink-shaded diamond. Scene features inside this second diamond (in object space) will focus to positions inside the first diamond (in image space). This means their blur will be no greater than one circle of confusion, i.e. they will appear "in focus" on the sensor. The width of the object space diamond is called the depth of field. For your convenience we've drawn the depth of field in green on the second snapshot at left. |
Looking at the dark red construction lines on the applet, it's clear that the width of the pink-shaded diamonds will depend on the size of the circle of confusion. Let's call the diameter of this circle C. It's also clear that the width of these diamonds will depend on the distances they are from the lens. Given the focal length of a lens and one of these two distances, we can compute the other distance using Gauss's ray construction. Thus, we only need two of these three variables. We'll use the focal length, denoted f, and the distance to the in-focus plane in the scene (the center of left diamond), denoted U. If you've been looking at the previous applets, the latter distance, which is variously called focus setting, focus distance, or subject distance, is the same as so in previous applets. Finally, you can see from the layout of the construction lines that the width of these diamonds will depend on where these lines originate on the lens, i.e. the diameter of the aperture. As we know from earlier applets, this size is specified by an F-number N.
From these four quantities, and using algebra that captures the geometry of the
dark red construction lines, we can compute the width of the pink-shaded
diamonds and hence the depth of field. It is beyond the scope of this applet
to take you through this derivation, but you can find it in slides 43 through
47 in the
lecture titled "Optics I: lenses and apertures".
The final formula, which is only approximate, is
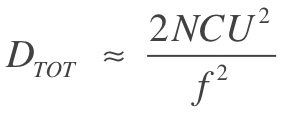
This formula is shown on the applet, along with the number we compute from it. Below this is another number, labeled as "Depth of Field" on the applet. This is the actual width of the pink-shaded diamond in object space, computed analytically from the construction lines. The difference between these two numbers highlights how much of an approximation the formula is at certain scales. To make the construction lines easy to understand, we've set the initial F-number to 0.5 and the initial circle of confusion to 20mm, but neither setting is reasonable for a real camera. If you change the F-number to 2.0, you'll find that the numbers nearly match.
At long last, let's play with the applet. Drag the circle of confusion slider left and right. Notice the effect it has on depth of focus (on the right side of the lens) and depth of field (on the left). As the circle gets bigger the allowable blur size increases, and the range of depths we consider to be "in sharp focus" increases. For small circles of confusion the relationship is linear, as one would expect from the position of C in the depth of field formula - in the numerator and not raised to any power. As the circle gets very large the relationship becomes non-linear. At these sizes the formula we've given isn't accurate anymore.
Now reset the applet and try dragging the F-number slider left and right. Note that as the aperture closes down (larger F-numbers), the depth of field gets larger. Note also that one side of the depth of field is larger than the other. Beginning from the in-focus plane, more stuff is in good focus behind it than in front of it (relative to the camera). This asymmetry in depth of field is always true, regardless of lens settings, and it's something photographers come to learn by heart (and take advantage of). Finally, note that while N is not raised to any power in the depth of field formula, the width of the diamond seems to change non-linearly with slider motion. The reason for this is that for fixed focal length f, aperture diameter A is reciprocally related to N (through the formula N = f / A), and as the construction lines show, the width of the diamond really depends on A.
Reset the applet again and drag the focal length slider. Note that the depth of field changes dramatically with this slider, becoming especially large at short focal lengths, which corresponds to wide-angle lenses. This dramatic relationship arises from the fact that f appears in the denominator of the formula, and it's squared. Formally, we say that depth of field varies inversely quadratically with focal length. As photographers know, long focal length lenses have very shallow depth of field.
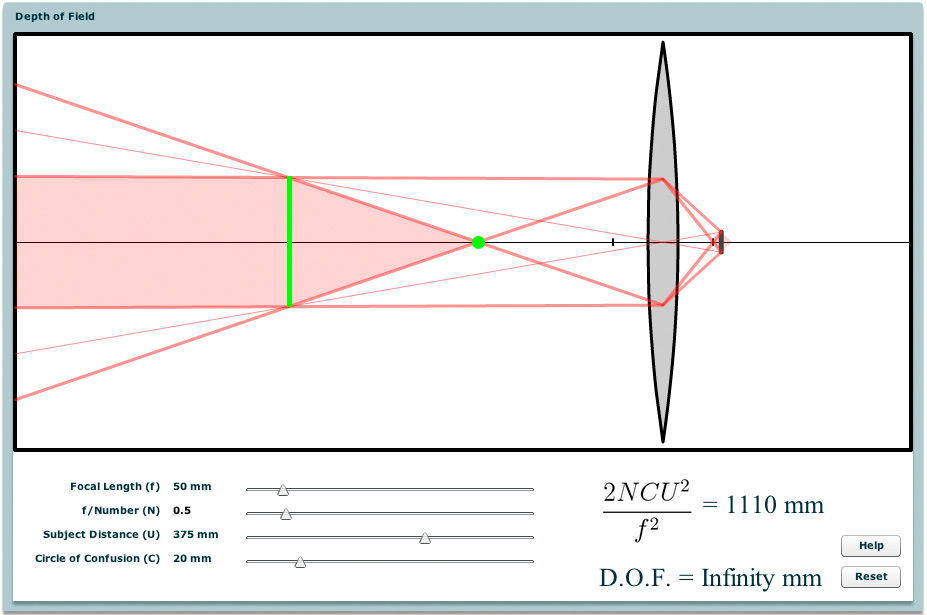
Now leave the focal length slider at 50mm and start playing with the subject distance slider. As the subject gets further away, the depth of field increases. Once again note that the change becomes dramatic at long subject distances. This arises from the fact that U appears squared in the (numerator of the) formula. In other words, depth of field varies quadratically with subject distance. Note also that for these settings of C, N, and f, when the subject distance rises above about 365mm, the far side of the depth of field (behind the in-focus plane relate to the camera) becomes infinite, hence the computed depth of field (called D.O.F. in the applet) says "Infinity".
|
The subject distance at which this happens for these lens settings is called
the
hyperfocal distance.
Its derivation is given in slide 56 of the
lecture titled "Optics I: lenses and apertures".
The derivation also shows that the near side of the depth of field, i.e. the
rightmost tip of the pink-shaded diamond, is about half-way between the
in-focus plane and the lens. In the image at left, the hyperfocal distance is
indicated with a vertical green line, and the halfway point - the closest
distance that would be sharp, with a green dot. Photographers would say that
if they can figure out the hyperfocal distance for a particular focal length
and F-number, everything from half of that distance to infinity will be in
sharp focus. Wouldn't it be nice if you could press a button and the camera
would focus at its hyperfocal distance? Maybe someone can write such a plug-in
for future
programmable cameras (Pardon the shameless plug for our lab's
research.)
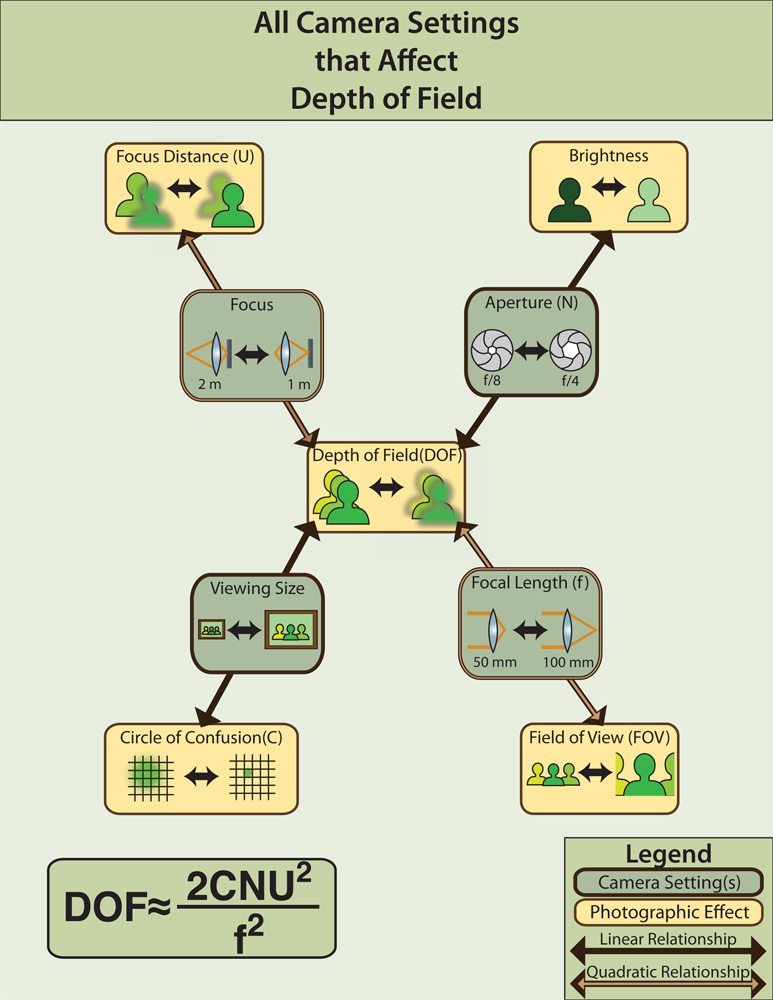
Confused by all these relationships? Don't worry - it takes even professional photographers a long time to master them. If you can memorize the formula you're ahead of most of them, because while it's not terribly complicated, you won't find this formula in any how-to book on photography. To help you along, the graph at left summarizes the relationships we've discussed. Click on the thumbnail image to get a larger version. The graph contains the same four camera settings we've considered: C, N, and f, and U. It also shows the side effects of changing these settings - something we haven't talked much about. For example, changing the size of the circle of confusion C (e.g. making it larger than a pixel) changes how large you can print the image on photographic paper, or how large you can display it on your screen, without it looking blurry. |
One normally associates shallow depth of field with a single-lens-reflex (SLR) camera, because only they have a large enough aperture to create this effect. However, if you allow yourself to capture, align, and combine multiple images, then you can approximate this effect computationally. Here are several devices we've built in our research laboratory that do this.

|
The most brute-force way to implement this idea is to build a large array of cameras. Pictured at left is the Stanford Multi-Camera Array. It's array of 100 webcams, aimed slightly inwards so that they share a common field of view, and wired together so they can be fired at once. If you capture a set of images using this array, place the images so that one particular object lines up (i.e. falls in the same pixel in all the images), and add the images together, you can approximate the depth of field produced by a lens as large as the array. If the array is 15 inches across like the one pictured at left, that's a very shallow depth of field! Look at this 15-second video showing synthetic aperture focusing to see through foliage. The input for this video was an array of 45 cameras spanning a "synthetic aperture" 6 feet wide. |

|
If you insert an array of microlenses into an ordinary camera, you can individually record each of the light rays entering the camera, rather than having groups of them brought to a focus inside pixels. The resulting dataset is called a light field. We've done a lot of research in our laboratory on microlens-based capture of light fields, including building a camera whose images you can refocus digitally after you take the picture, as well as a microscope (pictured at left) with similar abilities. (The microlenses are inside the red-circled housing.) Using this approach you can also change the depth of field while you're digitally refocusing it. |
|
The aperture on a cell phone camera is very small - almost a pinhole. As a result cell phones have a large depth of field. However, if you record video while moving the phone sideways, then you align and add the frames of video together, you can simulate the large aperture of an SLR. If you own an iPhone, we've written an app called SynthCam - available in the iTunes app store - that lets you do this. In addition to their shallow depth of field, large apertures gather more light. This is one reason SLRs take better pictures in low light than cell phones. However, if you add many frames together, then you can match the light-gathering ability of an SLR. Thus, pictures you take with this app will be less noisy than pictures taken with the iPhone's native Camera app. If you don't own an iPhone, here's a web site with examples of photographs created using the app. |