Graphical concept: Eddy Talvala
Applet: Katie Dektar
Text: Marc Levoy
Technical assistance: Andrew Adams
Additional illustrations: Eddy Talvala
The amount of light recorded by a camera depends on the size of the lens
opening (called the aperture) and the amount of time light is allowed
to strike the film or sensor chip (called the exposure time). The
former is controlled by varying the f/stop, a.k.a. F-number, and the latter is
controlled by varying the shutter speed. In a digital camera it is also
possible to vary its sensitivity to light by amplifying the voltage observed at
each pixel position before converting that voltage to a number. The amount of
amplification is called the ISO number. Unfortunately, each of these
variables has a side effect: opening the aperture also decreases
depth of field, lengthening the
exposure time also increases
motion blur (including motion blur due to camera shake),
and increasing the ISO number also increases
image noise. In this applet, we explore these tradeoffs.
Playing with aperture
The aperture of a camera is controlled by opening or closing a diaphragm, which
is usually located in the middle of the lens assembly. The rules of
geometrical optics allows us to replace this assembly with a single lens of
appropriate shape if it simplifies our analysis. In this
thin lens approximation, the diaphragm would be located just
before or after the lens (along the optical axis). The aperture is then
specified as an F-number N, defined by the well-known formula N = f/D,
where f is the focal length of the thin lens (a.k.a. the
effective focal length of the original lens assembly), and D is
the diameter of the diaphragm opening. Doubling N while holding f constant
halves the diameter D of the aperture, which in turn decreases its area by 4x.
To make things more convenient, N is usually given as a sequence of square
roots, e.g. f/4, f/5.6, f/8, f/11, f/16, f/22. Moving rightward in this
sequence by one entry is called "closing down the aperture by one f/stop",
e.g. from f/8 to f/11. Since f/11 is a smaller diameter than f/8 by sqrt(2),
the area of the aperture is decreased by 2x. This halves the amount of
light entering the camera - a factor that's easier to remember than 4x.
In the applet above, try dragging the aperture slider left and right. Each
tickmark is 1/3 of an f/stop. The darker tickmarks have been rounded to the
traditional numbers (e.g. f/1.4, f/2, f/2.8,...,f/22). Note that as you move to
lower F-numbers, the image gets brighter, eventually turning white as it
saturates the imaginary sensor in this visualization. Similarly, as you move
to higher F-numbers, the image gets darker, eventually approaching black. The
image should get twice as bright (or dim) with each f/stop of motion, but we've
cheated on this so that the image doesn't disappear entirely. In other words,
don't take the appearance of the image as being scientifically correct for each
setting of the sliders; it's just a visualization.
As you move to higher F-numbers, note also that the foreground figure (in
green) and background figure (in yellow) come into focus. This is the main
side effect of changing the aperture - it increases depth of field. A full
discussion of depth of field is beyond the scope of this applet, but an
approximate formula is Dtot = 2NCU^2 / f^2, where N is the F-number, C is the
allowable size of blur on the sensor, U is the distance to the scene, and f is
the focal length of the lens. For example, for this picture of a
pensive folk dancer,
N = f/4, C = 2.5 microns (the width of one pixel on the Casio EX-F1
point-and-shoot camera that took this shot), U = 5.9 meters (19 feet), and f =
73mm. Plugging these into the formula, we get Dtot = 132mm (about 5 inches),
which is barely the depth of the dancer's face. Note that 73mm on this camera
is equivalent to 362mm on a 35mm SLR, i.e. a real telephoto shot. It is
therefore not surprising that the depth of field is shallow. This makes it
critical that the focus be good.
Playing with exposure time
The exposure time of a digital camera is controlled either by opening and
closing a mechanical shutter lying near the sensor chip, or by
controlling when the sensor pixels are reset to zero and when the electrons
they have accumulated since being reset (due to the arrival of photons) is read
off the chip. The latter is called an electronic shutter and is used
in cell phone cameras and some point-and-shoot cameras. In either case,
exposure time is measured in fractions of a second. (For this applet,
let's assume that mechanical shutters can open instantly and close instantly,
and that electronic shutters can reset and read off the entire chip at once.
This allows us to ignore
"focal plane distortion" and
"rolling shutter distortion", respectively.
In the applet above, try dragging the exposure time slider left and right.
Once again, the darker tickmarks have been rounded to the traditional
fractional powers of two (e.g. 1/2, 1/4, 1/8,..., 1/500). Note that as you
move to higher shutter speeds, the image gets darker. Now set the aperture to
a high F-number, like f/16, and make the exposure time long, like 1/8 second.
What happens to the visualization? It becomes blurred, reflecting the fact
that most people cannot hold a camera steady enough to shoot at 1/8 second
without using a tripod. This blur is called camera shake or handshake. Of
course, if the object itself is moving, there will be additional blur, called
motion blur. Both kinds of blur will be worse for long exposures than for
short exposures. In the remaining paragraph, we use the phrase "motion blur"
to denote both kinds of blur.
Playing with ISO
As mentioned earlier, a digital camera can be made more sensitive to light by
amplifying the voltage observed at each pixel position before converting that
(analog) voltage to a (digital) number, i.e. before A/D conversion. These
numbers are arbitrary, so it was decided to use the same system originally
defined by the
International Standards Organization (ISO) to denote the sensitivy of film,
a.k.a.
film speed.
This system was derived from an earlier standard for film speed established by
the
American Standards Association (ASA), a.k.a. the American National
Standards Institute. The system says that a doubling of the ISO number denotes
a doubling of sensitivity. In a digital camera this means an amplification by
2x of the voltage. By convention ISO 100 refers to no special amplification
(beyond that normally done when the chip is read off), so it is the lowest ISO
number available on most digital cameras. The maximum ISO varies from camera
to camera. In addition, some cameras use multi-stage amplification, and other
cameras switch at some point from analog amplification before A/D conversion to
digital multiplication afterwards. In this applet we ignore these variations.
In the applet above, try dragging the ISO slider left and right. The tickmarks
are powers of two beginning with 100 (i.e. 100, 200, 400). Note that as you
move to higher ISO numbers, the image gets brighter. Now set the aperture to a
high F-number, like f/16, so that the image is dark, and move the ISO slider
rightwards. What happens to the visualization? It gets brighter, but it also
becomes noisy! Noise means random variation in the intensity of pixels that
should be the same color. It is beyond the scope of this tutorial to describe
the various causes of image noise in a digital camera; it suffices to say that
if you amplify the voltage levels coming from a sensor chip, you also amplify
any random variation in these levels. A similar effect occurs when moving to
films of higher speed, i.e. higher ASA, although for somewhat different
reasons; it leads to graininess in the developed negative and hence in the
photographic print.
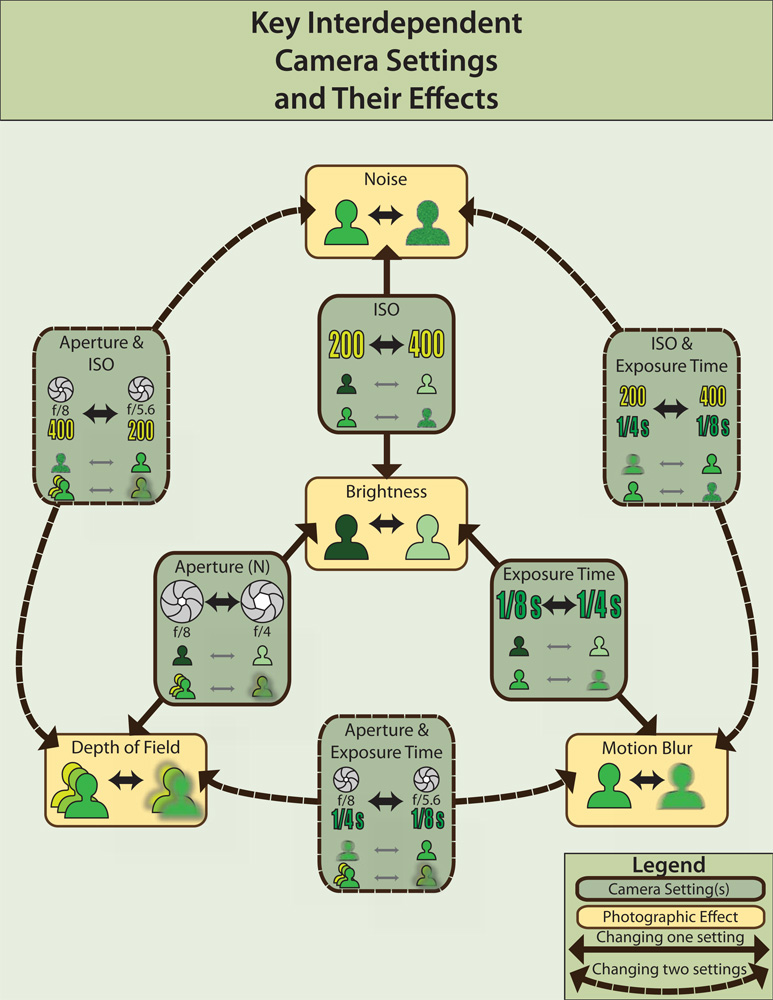
Choosing the best aperture, shutter speed, and ISO
So given this labyrinth of variables (i.e. camera settings) and side effects,
how should a photographer set up for a shot? The graph below shows the three
main variables: aperture, exposure time, and ISO, and the four main effects:
brightness, depth of field, motion blur, and noise. Click on the thumbnail
image to get a larger version. If you change one of these settings at a time,
you're following one of the solid lines on the graph. We've already talked
about these paths. If you change two settings at once, you're following one of
the dashed paths. These paths represent tradoffs between two variables.
Assuming you have an SLR, the "Av/A", "Tv/T", and "P" modes help you make these
tradeoffs intelligently. Let's go through each tradeoff one at a time.
First, let's consider the tradeoff between F-number and shutter speed. If you
want control over depth of field, but you don't care about motion blur, then
set your SLR to "Av" (called aperture priority), select the F-number
you want (low F-number = shallow depth of field), and let the camera adjust the
shutter speed so that total exposure is correct. To try this using our applet,
click on "Av/A" (it's called "A" on some cameras), then fiddle with the
F-number. As F-number gets low, depth of field becomes shallow; as F-number
gets high, depth of field becomes deep but motion blur kicks in. To see the
highest depth-of-field without also seeing motion blur, raise the ISO a few
notches and try again.
If on the other hand you want control over freezing the motion (or deliberately
creating motion blur), but you don't care about depth of field, then set your
SLR to "Tv" (shutter priority), select the shutter speed you want
(high speed = minimal motion blur), and let the camera adjust the F-number to
compensate. To try this using our applet, click on "TV/S" (it's called "S" on
some cameras), then fiddle with the exposure time. You should see the same
tradeoffs as before. This similarity in behavior doesn't mean the two priority
options are interchangeable. Our imaginary scene has a constant brightness.
In the real world, these options let you fix one of these variables, and the
camera will adjust the other variable according to the measured brightness of
the scene.
By the way, most SLRs also have a "P" (program) mode, in which the
camera choosing a reasonable combination of F-number and shutter speed, and
with a single dial you can simultaneously change both of them in opposition,
such that the total exposure stays constant. Finally, for the brave there is
"M" (manual) mode, in which you separately control everything and need
to watch a meter visualization to keep the exposure correction, and for the
cowardly or lazy there is "A" (automatic), which adjusts everything
for you. Our applet has a "Manual" mode, but we didn't implement the "P" or
"A" modes because for a scene of constant brightness, they don't do anything
interesting.
Finally, we come to the vexing question of how to factor ISO into this mix. A
mathematical analysis of image noise is beyond the scope of this applet, but it
turns out that while raising the ISO increases noise, it increases the
signal faster. In other words, raising the ISO improves the
signal-to-noise ratio (SNR) of the image. Moreover, it does so more
effectively than brightening the image in Photoshop, because ISO-based
brightening is performed in the camera before A/D conversion, while the signal
is still an analog voltage, thereby minimizing what's called quantization
noise. So should you raise the ISO until the noise is only barely tolerable,
then then fiddle with F-number and shutter speed as described earlier? This is
not an unreasonable approach, but there is a better one.
A further analysis shows that raising exposure time improves SNR faster
than raising the ISO. Basically, getting more light into the camera is a good
thing. Thus, the optimum strategy is: (1) maximize exposure time (by adjusting
F-number and shutter speed) subject to the limits you are willing to tolerate
on depth-of-field blur and motion blur (including blur due to camera shake),
making sure not to saturate the sensor (i.e. avoid excessively blown-out
highlights), then (2) to the extent your image is still not bright enough to
fill the available range of intensities, increase the ISO until it does. You
can judge this range of intensities by looking at a digital viewfinder, or by
looking at a histogram of
image intensities if your camera provides one. In practice this two-step
strategy is difficult to perform, especially if you're in a hurry, but
fortunately modern digital cameras do it for you, at least in "A" (automatic)
mode.