Programming assignment #2 help session -
Polygon scan conversion with supersampling
CS 248 - Introduction to Computer Graphics
Autumn Quarter, 2000
Marc Levoy
1. Normal scan conversion
We will present two methods for supersampling scan conversion.
One is a single-pass methods, and the other is a multi-pass method.
But first, here is the normal scan-conversion process for comparison.
|
|
|
| (1) |
|
(2) |
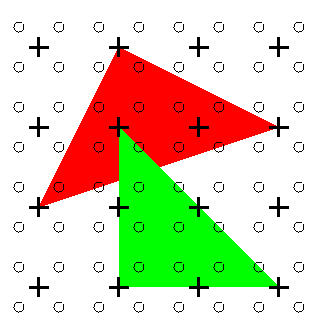
Figure 1
Normal scan conversion
(1) Source triangles with pixel centers as crosshairs. Note that
sample locations (empty circles) coincide with pixel centers.
(2) Scan converted image.
We assume that hitting the edge of a triangle constitutes a 'hit'.
2. Supersampling pattern
If you are sampling at a density greater than the pixel density, you need
some way to specify where those supersamples are located and how to combine
them. Usually the locations
(offsets from the pixel center) and the weights of the supersamples
are the same for all pixels.
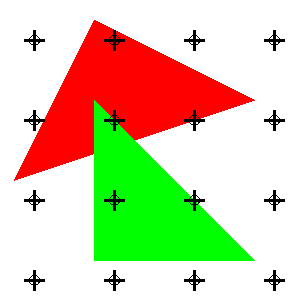
Figure 2 shows an example supersampling pattern. The crosshairs
represent the pixel centers. The
four circles surrounding the pixel centers are the supersamples
associated with the pixel. For this pattern, each supersample is weighted
equally. Since the weights for any supersampling pattern must add to 1, this
means that for this pattern, each supersample has a weight of 1/4. This is
the supersampling pattern that will be used in the remainder of this document.
Note that for this
pattern, the supersamples form a regular grid.
This need not be the case for other patterns.
|
Figure 2
An example supersampling pattern.
Pixel centers are represented as crosshairs.
Supersample locations are represented as empty circles.
3. Single-pass supersampling scan conversion
A single-pass supersampling scan conversion process is composed of
the following steps:
- The triangles are sampled at all the supersample locations.
The pixels generated by the scan conversion are stored
in a dense array which is s times the size of the final picture array, where s is the number of supersample positions per pixel.
- Set each pixel in the final antialiased image
equal to the weighted average of
the values of the s supersamples corresponding to that pixel.
For the supersampling pattern given in section 2, set:
      canvas[pixel] := denseimage[pixel][supersample1] / 4
                     + denseimage[pixel][supersample2] / 4
                     + denseimage[pixel][supersample3] / 4
                     + denseimage[pixel][supersample4] / 4
In general, if the supersampling pattern contains s supersamples and the
image contains p pixels, we would need:
- An array of p × s pixels for temporary storage
of the supersamples.
- An array of p pixels for the final image.
- At least p × s pixel writes into the temporary array
(depends on the number, sizes, and shapes of the triangles).
- p pixel writes into the final image array.
- 1 scan conversion at supersampled density.
|
|
|
|
|
|
|
| (1) |
|
(2) |
|
(3) |
|
(4) |
Figure 3
Single-pass supersampling scan conversion.
(1) source triangles with pixel centers as crosshairs
(2) supersample locations as empty circles
(3) scan conversion to dense grid
(4) averaging down
4. Multi-pass supersampling scan conversion
(a.k.a. the accumulation buffer algorithm)
Conceptually, a multi-pass supersampling conversion process is
composed of the following steps:
- For each of the s supersample locations,
shift all triangles an amount exactly
opposite the offset of the supersample from the pixel center.
Apply normal scan conversion to those shifted triangles. Each one of these
passes produces an entire image at the normal density.
- Set each pixel in the final antialiased image
equal to the weighted average of the values of the pixel
from the s passes.
In other words, for supersample locations given in section 2:
      canvas[pixel] := temp[supersample1][pixel] / 4
                     + temp[supersample2][pixel] / 4
                     + temp[supersample3][pixel] / 4
                     + temp[supersample4][pixel] / 4
|
|
|
|
|
|
| (1) |
|
|
|
|
(4) |
Figure 4
Multi-pass supersampling scan conversion.
(1) Source triangles with pixel centers as crosshairs.
(2) Shifting triangles. The supersampling pattern above the arrow
indicates which supersample the shift corresponds to.
Note: Only the triangles get shifted!
(3) Normal scan conversion to temporary array.
Since we are doing normal scan conversion,
sample locations coincide with pixel centers.
(4) Averaging down.
In the formulation above we store the results of each of the s passes in
separate arrays and average them when all the passes are completed.
In practice, we can accumulate the result of each pass into the final array
as they are completed.
This reduces the number of temporary buffers that are needed from s to
one.
Also, we can shift each triangle right before we scan convert it. This way, we
won't need to shift all the triangles at once.
In general, if the supersampling pattern contains s supersamples and the
image contains p pixels, we would need:
- An array of p pixels for temporary storage
of the supersamples.
- An array of p pixels for the final image.
- At least p × s pixel writes into the temporary array
(depends on the number, sizes, and shapes of the triangles).
- p × s pixel writes into the final image array.
- s scan conversions at normal density. There is more time overhead
due to initializations in the scan conversion.
Keep in mind that both single-pass and multi-pass methods result in the
same final image array (ignoring possible floating-point errors).
The difference is in the time and space (memory) efficiency of the two methods.
The single-pass method uses more space but takes less time than the
multi-pass method.
5. Pseudocode for the accumulation buffer algorithm
This is almost the same as the algorithm in Appendix A of the
assignment #2 handout.
Both canvas and temp are pixel arrays with sizes equal
to the size of the canvas. As before, s is the number of supersamples.
 1   for each pixel in canvas canvas[pixel] := black;
 2   for i = 1 to s
 3     for each pixel in canvas temp[pixel] := black;
 4     for each triangle
 5       shift triangle for supersample position
 6       for each pixel in triangle
 7         temp[pixel] := triangle color;
 8     for each pixel in canvas
 9       canvas[pixel] := canvas[pixel] + 1/s * temp[pixel];
10     update canvas
(The assignment handout says 'subpixel' instead of 'supersample.'
It's the same thing.)
6. Why you need two arrays
Remember that you need two arrays (canvas & temp) no matter what!
Your program will not work if you have only one array! In particular, if you
have only one array, the color of a triangle underneath another will
'leak though' the color of the triangle on top.
Roughly, the reason you need two arrays is that sometimes you want to overwrite
the pixel in the canvas, and other times, you want to add to it. You cannot
have it both ways if you only have one array.
7. Progressive refinement
With the accumulation rule:
9 canvas[pixel] := canvas[pixel] + 1/s * temp[pixel];
in the pseudocode above, the contents of
canvas after the ith supersample will look like the
sequence of images shown in figure 5(a). Essentially, as we get more and more
samples, the image gets brighter and smoother.
| (a) |
|
|
|
|
| (b) |
|
|
|
|
Figure 5
Progressive Refinement.
(a) Accumulation buffer (i.e. the canvas array)
contents after the ith supersample, without
progressive refinement.
(b) With progressive refinement.
The triangles were scan converted with
the supersampling pattern in section 2, with the sampling order
specified in fig. 4. The result was zoomed 8x.
What we really want is a sequence like 5(b), where the image still gets smoother
but the brightness stays constant. To do this, we have to renormalize
the weights at each step so that the sum of the weights for the
supersamples obtained so far is 1. I won't give the derivation here, but
this process of renormalization yields the following accumulation rule:
9 canvas[pixel] := (i-1)/i * canvas[pixel] + 1/i * temp[pixel];
This gives you the image sequence in 5(b).
The accumulation rule is the same as the one given in Appendix A of the assignment #2 handout. There
is one restriction:
This accumulation rule will work only in the case where the supersamples have
equal weights.
Here is the accumulation rule for the general case.
Suppose the supersample weights are given by
w[1], w[2] ... , w[s], where
the w[i]'s sum to 1. Let v[i] = w[1] + w[2] + ... + w[i].
Then the accumulation rule is:
9 canvas[pixel] := (v[i]-w[i])/v[i] * canvas[pixel] + w[i]/v[i] * temp[pixel];
Note that if all the weights are equal (i.e. w[i]=1/s), then
the new accumulation rule simplifies to the previous one.
hishii@cs.stanford.edu
Copyright © 2000 Hiroshi Ishii
Last update:
October 27, 2000 03:00:00 AM