CS348b: Computer Graphics:
Image Synthesis Techniques
Assignment 2: Realsitic
Lens System Simulation
Handed out: April 24
Due: May 8
Description
Many rendering systems (including lrt) approximate irradiance on the film plane by sampling scene radiance through an infinitesimal aperture (i.e a pin-hole) or by using a thin lens approximation. Unfortunately, these techniques are geometrically and radiometrically incorrect and can therefore 'lay to waste' much of the physically accurate computation involved in realistic image synthesis. A realistic camera model can accurately compute film irradiance by tracing sample rays through a multi-lens system, correctly revealing effects such as depth of field, vignetting and film exposure.
Step 1
Re-read the paper “A Realistic Camera Model for Computer Graphics”, by Kolb, Mitchell, and Hanrahan, proceedings of SIGGRAPH 1995 (web page).
Step 2
Next, retrieve a copy of the
skeleton files, example scenes, and lens description files for this assignment
and copy them to your home directory.
A stub implementation of the camera implementation in the file /usr/class/cs348b/hw2/realistic.cc. Copy this file to the cameras/ directory in your lrt directory and edit the PYWEB_CAMERAS_CCFILES line of the Makefile.filelist file to add realistic.cc to the camera implementations that are compiled. Because lrt is written with a plug-in architecture, it is not necessary to edit any of the rest of lrt’s source code to add the camera. Comments in realistic.cc will explain the method you need to implement for the new camera model.
There are three main tasks for this assignment:
- Write
code that parses a tab-delimited lens description file and builds up an
appropriate data structure to represent the lenses. The format of the
files is described in the paper in Figure 1
- Given
an image and lens sample position, trace a ray through the lens system to
compute the camera ray to trace into the scene. For this step, you can
choose the direction of the initial ray to trace through the lens system
by sampling a point on the aperture stop. (This will give slightly
incorrect results, as explained in the paper, but is easier while you are debugging
this part of the assignment.
- Compute the correct exit pupil using a thick lens
approximation. Then sample lens positions for the ray through the lens
system from the exit pupil instead of the aperture stop.
The lens files can be found in /usr/class/cs348b/hw2/lenses. We have prepared a couple of scene files for you to render with your implementation. These can be found in /usr/class/cs348b/scenes/camera*.rib. We will put reference images in /usr/class/cs348b/hw2 folder shortly. You should make sure your implementation can render all of the examples correctly.
FAQ
Below are some frequently asked
questions which should be helpful. Be sure to check back here before emailing
for help.
- Some people have been asking for a concrete todo list for this
assignment to help getting started.
Here is a suggested order of things to tackle:
- Read in the lens file and load it into a data structure
suitable for tracing rays. You’ll
probably want to do this first.
- Write a lens ray intersector function which given an
arbitrary ray, computes the lens intersection and bends the ray given
Snell’s law.
- Compute the principle planes and focus points of the lens
system. From these, you can
compute the focal length. The
dgauss.dat lens should be about 100mm.
- Set the distance to the film using the principle planes and
focal length information. Test the
focus by shooting a ray from the film as described below.
- Set the aperture using the Fstop information as described
below. The aperture diameter for
the dgauss lens at Fstop 2.0 should be about 34mm. (Updated)
- Compute the position of the exit pupil as described below.
- Implement the GenerateRay function, transforming x,y raster position and x,y sample position to points
on the film toward a point exit pupil and trace the ray.
- The camera parameters are as following:
- “focaldistance” equals the distance
from the front of the lens system to the object in focus. You will need to use this value to
determine how far back to put the image plane so that things are in
focus. (This is NOT the focal
length of the lens system.) Note
that this is different than what is talked about in the Kolb paper but
should make the math of computing where the image plane is a bit easier.
- “fstop” is the fstop setting of the
lens, relating the effective aperture
and the focal length, not the physical
aperture. You will need to use
this value to compute the diameter of the physical aperture should
be. See “Setting the Aperture”
below.
- “filmdiag” is the distance from the
lower left of the film image to the upper right.
- Read carefully section 3.2 of the paper. It describes the “Thick Lens Approximation” which can give you the focal points and principle planes of the lens system. From these you can get the focal length of the lens.
- Setting the Aperture: (Updated)
The fstop relates the effective aperture of the lens system to the focal length by the following relationship:
Fstop = (focal length) / (effective
aperture)
You can compute the focal length using the Thick Lens Approximation mentioned above. This equation however is not really that usefull since the effective aperture is different than the physical aperture since the lens elements between the aperture and the image plane will change the image of the aperture. A more useful equation is:
Fstop = 1 / (2*sin pheta)
Pheta defines the cone of light that comes into the focal point from parallel rays. We can compute the size physical aperture by tracing a ray through the lens system from the film side focal point. Where this ray intersects the plane containing the aperture provides the size of the physical aperture, as shown in the following figure:
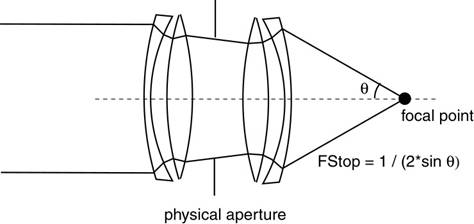
(Note that it is a sine function, not tangent which is not exactly intuative. This is due to the principle planes not really being planes.)
- Sampling
sample->lensX, sample->lensY provide a sample point in the range [0,1] evenly distributed across the range. In order to generate a distribution which is evenly distributed in a circle (the shape of the exit pupil), use the ConcentricSampleDisk function. Be sure to read the Camera chapter (ch. 6) of the LRT book for more information.
- Camera1.rib
- An updated camera1.rib as been placed in the /usr/class/cs348b/scenes directory. The fstop was incorrectly set to 1.4 which is unobtainable by the dgauss lens system. The new fstop is 2.0 which is at the limit of the lens system.
- Dat File
- There will always be one aperture in the dat file (indicated by radius 0.0).
- Computing the film plane distance
- Some people are getting confused about setting the film distance from the information in the paper. The paper uses signed distances in equation 2. Here is a drawing which should make it clearer:
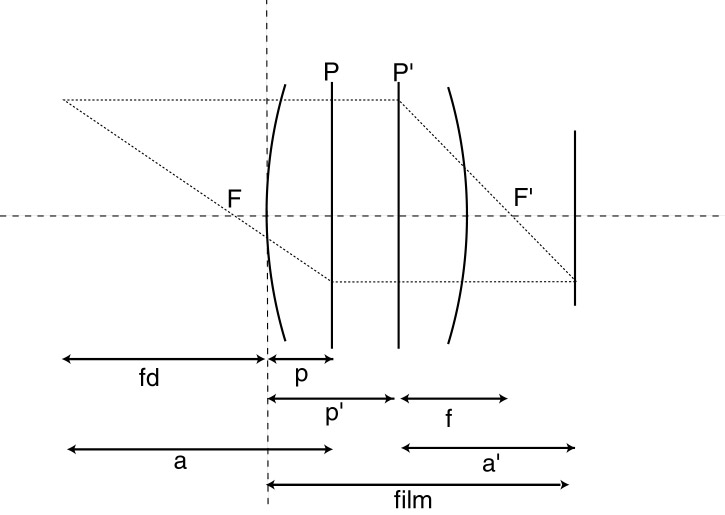
Assuming all lengths are positive in the above picture:
For an object to be in focus, the following relationship should be true:
1/a + 1/a’ = 1/f where f is the focal length as shown above.
We can substitute a and a’ to get:
1/(fd + p) + 1 / (film – p’) = 1 / f
where fd is the focus distance and p, p’ are the principle planes
We know p, p’ and fd so we can simply solve for film using simple algebra.
- You can test your focus calculation by tracing a ray from the center of the film into the lens. If your film distance calculation is correct, the ray should converge back to the lens axis at distance "focusdistance" from the front of the lens. You might be off a little but it should be close (within 1% of target). You could also use this method to compute the film distance by computing the inverse ray, but make sure that it makes it all the way through the lens system.
- Vignette Rays
- If a ray is vignetted by the lens system, you still need to return a legal ray in the GenerateRay function. An easy solution is to return a ray where the mint is greater than the maxt. Be sure your returned ray has legal direction vector -- if ray.D = (0, 0, 0), LRT behaves badly.
- Camera Origin
- The origin of the camera system is the front of all the lens elements, not the position of the film plate. This slightly diffferent than what is mentioned in the Kolb paper.
- Computing the Exit Pupil
- Read section 3.4 of the Kolb paper carefully which discusses how to compute the exit pupil. You may assume that the rear lens elements (between the aperture and the film) can be approximated by the thick lens approximation. Therefore can compute the 4x4 transformation of a point on the physical aperture to get size and location of the exit pupil. Of course you will have had to already set the physical aperture size using the Fstop as discussed above.
- Generating Rays.
- The Kolb paper talks about generating camera rays via two methods, the thick lens approx and a full ray trace of the lens system for each ray. Your implementation should perform a full ray trace through the lens system for each ray inside the GenerateRay function since some lens systems are non-linear.
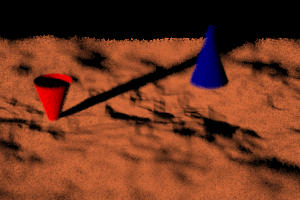
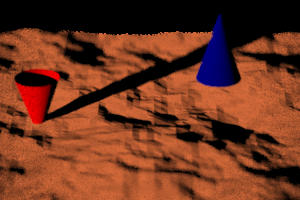
Reference Results
Here are results from my reference implementation. Please let me know if you think there any errors in these images.
/usr/class/cs348b/scenes/camera1.rib
Tiff Image:
/usr/class/cs348b/hw2/realistic.tiff
Here is the telephoto lens fstop =
5.6
Wide lens fstop = 4.0
Fisheye lens fstop = 4.0
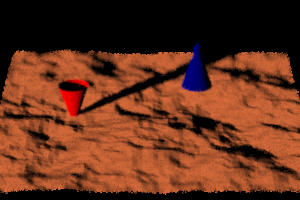
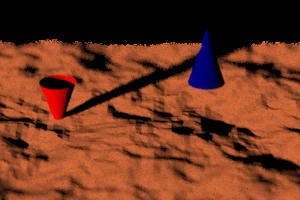
/usr/class/cs348b/scenes/focustest.rib

Tiff Image: /usr/class/cs348b/hw2/focustest.tiff
Submission
Turn in your
finished homework using the cs348b submit
script:
cd my-lrt-directory/cameras
/usr/class/cs348b/bin/submit
Make sure you hand in realistic.cc and a README file.
The README should contain instructions for compiling and running your code, and
a description of anything non-intuitive you've done. Please do not submit
any executables or object (.o) files. We'll be building your submissions
ourselves, and those just take up space.
Grading
This homework, like the other programming assignments, will be graded according to the following system:
0 - Little or no work was done
* - Significant effort was put into the assignment, but not everything works
correctly.
** - The algorithm you implemented was functionally complete; it passed all of
our tests.
*** - Your implementation was substantially faster or more flexible than a
straightforward implementation.