overview | images | implementation | downloads


Overview

The main focus of my work was to model realistic fur. I based my approach on the algorithm described by James T. Kajiya and Timothy L. Kay in their SIGGRAPH '89 paper, "Rendering Fur With Three Dimensional Textures." The algorithm makes use of an object called a texel, a rendering primitive intended to present a highly complex collection of surfaces contained within a defined volume. A ray passing through this texel is sampled to determine how much light is scattered through the volume to the eye. Note that this approach does not require the hairs to be modeled as individual piece of geometry. It is well suited to modeling short, thick fur, but less successful for long, fine hairs.


Images

Here are some images I produced using my fur shader. The shader only applies fur to triangle meshes, so I created the models below in Maya 3 using the simple built-in NURBS surfaces and converted them to triangle meshes before exporting. Sadly, I did not model my stuffed monkey as originally planned, since I spent most of my time implementing (and debugging) shader features. The images below are intended to demonstrate these features.

Brown Texel

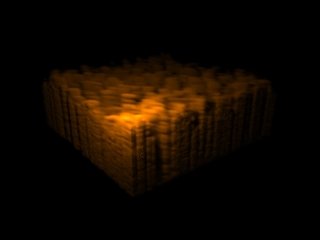
A single texel used to model uniformly thick body fur. The fur shader produces self-shadowing, as shown on the right side of the texel. Self-shadowing plays a key role in the appearance of furry surfaces.

Multi Texel

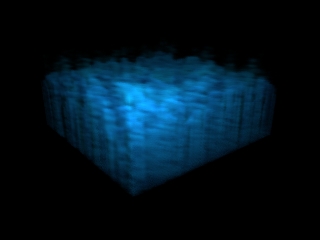
A single texel rendered using multiple shaders. The first shader consists of short, dense, dark blue fur. The second shader represents long, sparse, light blue fur. This multiple-fur-coat approach is useful in creating a slightly noisier texel and also helps to avoid a brushlike appearance when replicating a single texel across a surface.

Light Texel

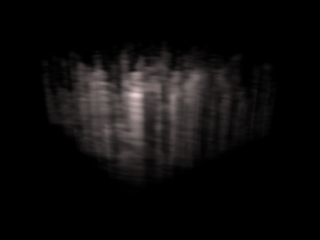
A single texel rendered using very low optical density. The optical density is a coefficient that relates local volume density to attenuation. The lower the optical density, the more transparent the texel becomes. Height noise was also liberally applied, resulting in hairs of noticeably different lengths.

Carpet Patch

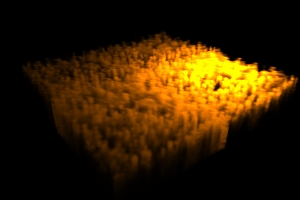
A patch of brown carpet viewed closely under an intense light. The surface was created by replicating the brown texel (above).

Red Carpet (1)

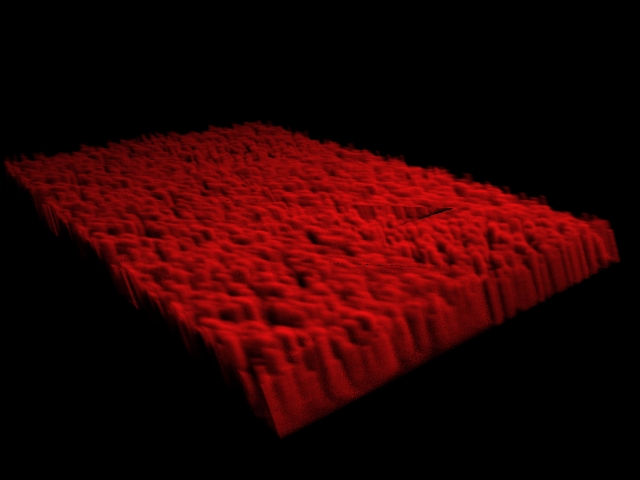
A piece of red carpet illuminated using two point light sources placed overhead. The vertex normals are perturbed so that the carpet hair appears to lean away from the eye.

Click here for a high-res image.

Red Carpet (2)

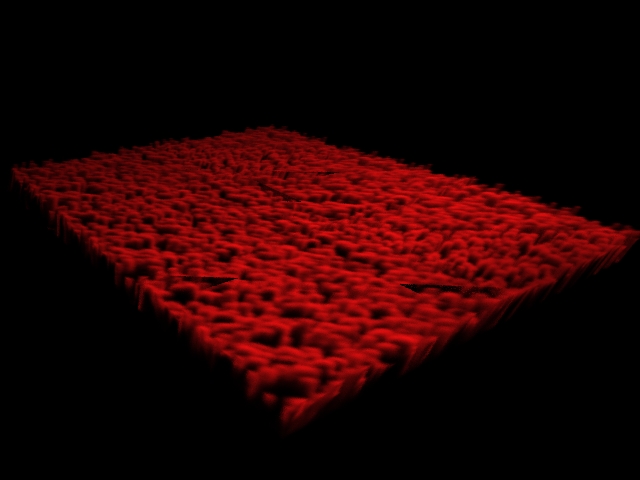
The same as above, except that the carpet hair now leans toward the eye. Due to the location of the light sources, the surface of the carpet is shadowed a bit more in this image.

Click here for a high-res image.

Blue Furball

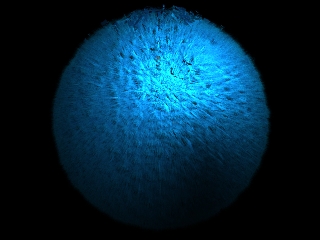
A simple furry ball rendered using the Multi Texel, above. The normals are biased to make the short hairs point downwards. Although the hairs are intended to be distributed uniformly over the surface, noise is added to both the height and orientation of the texels to avoid a porcupine-like appearance.

Furry Donut

A furry donut (dorm food, anyone?). The fur was rendered with two shaders: one using the Brown Texel (above), and the other using a brighter, longer, and more transparent variant of the Brown Texel.

Click here for a high-res image.


Implementation

My work consists of two programs: makefur, used to generate texel shaders, and a modified lrt, used to render furry surfaces. I will describe makefur first.

makefur

makefur reads an ASCII texel description file and generates a binary shader file. Here is a sample description file brown.desc:

40 40 40   // dimensions (x y z)
1.0 0.5 0.0   // color (base_r base_g base_b)
0.0 0.0 0.0   // color noise (noise_r, noise_g, noise_b)
0.6   // hair density (hd)
0.8 0.2   // height (base_h noise_h)
0.3 0.3   // thickness (base_t noise_t)
0.0 0.0   // currently unused
50   // optical density (od)

The above description file was used to generate the brown texel shader (the first image above). The output file was generated by running the program as follows:

makefur brown.desc brown.tex

In general, makefur will generate a single shader with the following properties:

  • volume dimensions x * y * z
  • N hairs, where N = x * z * hd
  • each hair has length L = base_h + Random(-noise_h, noise_h)
  • each hair has thickness D = base_t + Random(-noise_t, noise_t)
  • each hair has tangent vector [0, 1, 0], i.e. pointing straight up
  • each hair is located at [Random(1, x), Random(1, z)]

    I was hoping to implement the Poisson distribution as suggested in the Kajiya paper (instead of using simple dart throwing), but unfortunately did not have time. Another unimplemented idea involved some sort of fur curling by tracing a particle upwards through the volume from the base, guided by a perturbed tangent vector.

    lrt

    My additions to lrt include code to ray trace arbitrary triangular texel volumes and integrate the light scattered towards the eye along this ray. The primary features are:

    *   Triangular texels. lrt casts rays to intersect texels with triangular bases (as opposed to the rectangular volume described in Kajiya's paper). This is shown in the diagram below.

    This means that lrt can now apply fur to any triangle mesh. I experimented by modeling various blobby NURBS surfaces such as the ones below, then converting them to triangle meshes before rendering them in lrt.


    *   Multiple shaders per texel. lrt can apply an arbitrary number of custom-defined texel shaders to each texel on a given surface. This is useful for simulating two coats of fur, as described in Kajiya's paper. The furry donut and furball, above, were each rendered using two shaders.

    *   Simplicity and flexibility. Adding fur to a surface is pretty easy. To use the fur integrator, add the following line at the top of the RIB file:

      Option "render" "integrator" "fur_renderer"

    For each surface that you want to apply fur to, add the line before the primitive:

      Surface "fur" "texel_shader" shaders

    where shaders is a string containing a space-delimited list of shader files generated by makefur. For example, specifying "brown.tex" will apply the brown texel shader to every texel for this surface. Specifying "brown.tex lightsparse.tex" will apply both the brown and lightsparse texel shaders to every texel for this surface.

    The user can customize how the fur is applied to the skin. Parameters in the RIB file allow the user to specify, per surface, the height of fur texels, sampling density, and normal biasing (useful for achieving combed or smoothed fur effects). The available parameters are listed here:


    Parameter   Value   Meaning
    fur_sample   fs   Specifies the number of samples used in texel rendering. The portion of the ray inside the volume is divided into segments, each of which is at most fs units in length. Thus, a smaller value of fs leads to more samples and higher image quality, but longer rendering times.

    fur_height   fh   Specifies the base height of the texel volume. Suppose that a given triangle on the surface has vertices (v0, v1, v2) and normals (n0, n1, n2). Then these vertices, along with the computed points (v0 + fh * n0, v1 + fh * n1, v2 + fh * n2), form the texel volume for this triangle.

    fur_height_noise   fn   A random value between 0 and fn is added to the base fur height fh for each vertex.

    fur_normal_bias   [nbx, nby, nbz]   Biases each vertex normal in the mesh by adding [nbx, nby, nbz] and then renormalizing.

    fur_normal_noise_bias   [nnbx, nnby, nnbz]   Adds noise to each vertex normal in the mesh by adding [nnbx, nnby, nnbz] and then renormalizing.


    For example, the line

      Surface "fur" "texel_shader" "brown.tex" "fur_sample" 0.01 "fur_height 0.4" "fur_normal_bias" [0.0 -0.2 0.0]

    says to apply the texel shader "brown.tex" with sampling spacing 0.01 (high quality), a uniform fur height of 0.4 units, with fur biased downwards (negative y-valued normal noise).

    My implementation of the texel rendering algorithm follows Kajiya's paper closely. Suppose a ray begins tracing through the world and intersects a furry surface. The integrator computes the amount of light reaching the eye by approximating the line integral along the ray through the volume. This approximation is computed by dividing the ray into a number of segments within the volume. Within each segment, a point is randomly chosen. Shadow rays are sent from this point to all the light source to compute the attenuated contribution from each light source; this is the step that allows fur self-shadowing. Finally, this lighting term is multiplied by factors involving the local density and hair tangent vector to get the final value.

    In implementing this algorithm, I created the following custom classes:

    FurIntegrator   Performs a mix of conventional Whitted ray tracing and texel rendering.

    FurSurface   Applies user-provided texel shaders to a surface. The rendering algorithm described in Kajiya's paper is implemented here.

    FurryMesh   Given a standard triangle mesh, computes averaged vertex normals and builds texel volumes according to various user-specified parameters, such as height, normal bias, and noise.

    FurryTriangle   Represents a single 3D volume to which texel shaders are applied at render time. Given a ray O + tD, computes the values of t at which the ray enters and leaves the volume. Also maps points (x, y, z) inside the volume to coordinates (u, v, s) in texel space.


    Downloads

    project   Source code for makefur and modified lrt. Includes sample RIB files and texel shader (.tex) files used to generate the images above.


    Acknowledgments

    I'd like to thank Pat Hanrahan and Greg Humphreys for their suggestions and tips. I also want to Andy Yu for helping me start the project off on the right foot, and Janet Chen for helping me with some nasty coordinate transform math.


    References

    [1] Kajiya and Kay, "Rendering Fur With Three Dimensional Textures", Proc. SIGGRAPH 1989, p271-280.