


CS348B - Image Synthesis
Eilene Hao and Cynthia Lau
Original Project ProposalWe broke down the task into two parts: a) iris rendering and geometry modeling (i.e. the eyeball), and b) subsurface scattering (i.e.the skin). While we both made sure we each understood both parts, Eilene mainly took on part a, and Cynthia mainly took on part b. Here is a writeup of our major parts.
To create the eye model, I implemented the paper "An Ocularists Approach to Human Iris Synthesis" by Lefohn, et. al for rendering the iris, applied some hacks to get the specular coating for the surface of the eye, and modeled the other geometry in Maya.
The Iris:
The iris is composed of "frustums of right circular cones", which are just cones that have their tops cut off so they look like megaphones. With a very small height, they give the iris its caved-in geometry. The total iris is composed of an arbitrary number of layers, each of which is textured with a unique texture, like layers that occularists paint onto an opaque base surface in their physical models. Layers will consist of several different types, from spokes to splotches to coloring on the outer edges. Each texture has an associated opacity map that indicates how much light will pass through at a particular pixel. When a ray hits the surface, the color that appears consists of a component of the color on the top layer plus the colors of the layers hit by that ray underneath it. Thus the color returned for an intersection = (1-opacity)*transmitted color + opacity*(current paint color)*(amount of light hitting the layer). In this way, the stacked cones produce more depth than just a plain merged texture, and you can create very different effects by mixing and matching the layers in various ways (including randomly) without having to remake textures (as seen in the following figures).
To implement this, I created a new BxDF class called IrisBxDF and a new material called IrisMaterial. Rather than modeling it as several cones in the world and having to store colors for each intersection, I modeled the iris as just one cone, and the material implicitly stores the layers below the top surface. The material is in charge of loading up all the texture files, which are are numbered and whose order can be changed easily from a file the order of textures. Since the bxdf knows about the rays that are sampled, it stores a pointer to the material when it is created and calls the color calculation code on the material for that set of rays. The material takes wo to recursively traverse through the layers and uses wi to calculate how much light is visible from the current layer based on the opacity maps of the layers above it. We use the approximation that the direction from each layer to the light sample is constant, since the layers are very close together. The index of refraction through the iris layers is 1.
The rendered models used about 12 layers of textures for the iris. These textures and their opacity maps were all done by hand in photoshop.
Some textures and their opacity maps. It took a lot more time to make these than I anticipated!:)

By swapping the order of layers, you can get really different looks with the eye. This example swapped the yellow texture shown above.


Some different angles. The problem with layering is that depending on how far apart you space the cones and how many layers you use, some angles will not intersect cones in the back, creating artifacts (though kind of neat when you can see the layers, see rightmost image).
The Eye:
The eye itself consists of two overlapping spheres, one for the sclera, the white part of the eye, and one for the cornea, the clear hemisphere over the iris. The Iris fits right inside the overlapping region. The sizes of these spheres is based on the dimensions given in the paper.
I had a bit of trouble getting the specular highlight to show up using the pbrt glass material, so I definted a new material that is basically transparent shiny metal. This gave me the nice highlights of the fresnel conductor, but we can still see the iris below it. The sclera has another extra slightly bigger sphere around it so made of the same material so that it has the same properties as the cornea. We added some roughness to the surface so that it wouldn't be completely smooth and hence look wetter.
We also had a problem with perfectly transmissive objects casting shadows. While we tried to prevent this by using photon mapping, this was extremely slow and also very noisy. So assuming the cornea does not absorb any light, I defined a "cornea" shape class of these clear spheres to return false whenever casting a shadow ray, thus making it a vampire sphere. It's a hack, but it seems to give a decent result, so for the performance gain, I think it was worth it.
The Skin and Eyelash Geometry:
The skin geometry was taken from a high resolution triangulated surface scan of Eftychios Sifakis's face. The problem was that his eyes were only partially open for the scan, so I had to use Maya to cut out the eye portion of the surface and also try to raise the eyelid a little more. Also, the eyelashes did not exist, so I created those by hand as triangulated surfaces and placed each one onto the eyelids. I tried to vary the sizes, shapes, and directions to get make them more realistic. Then, to get the data into a form we could render, I wrote a Maya plugin that would export it into the pbrt file format for a triangle mesh shape.
My biggest task was to implement subsurface scattering for the skin of the face; unfortunately, although the code framework was all pretty much there, I couldn't get the appropriate results in time, and we ended up excluding subsurface scattering in our final renderings. The primary references I used were "A Practical Model for Subsurface Light Transport" by Jensen et al, and the subsequent paper "A Rapid Hierarchical Rendering Technique for Translucent Materials" by Jensen and Buhler. Although I ended up not using the speedup techniques described in the second paper, it was useful as an additional description of the mathematics behind the general algorithm. Because skin subsurface scattering gets most of its effect from the diffuse approximation, and not as much from the single scattering term, I did not implement the single scattering. Implementation Approach I defined a new subclass of the BxDF class called SubsurfaceScatter (reflection.h/.cpp), and changed the code inside of the existing pbrt plugin for skin material so that the Skin::GetBSDF() function created a SubsurfaceScatter BxDF rather than a Lafortune one. The SubsurfaceScatter class stored the absorption and scattering coefficients empirically found in the earlier Jensen paper. Its SubsurfaceScatter::f() function was in charge of returning a component of the diffuse reflectance at a point on the surface, accounting for Fresnel effects. Since the original BSDF framework assumes that the given input and output vectors intersect the surface at the same point, I had to extend the class to also store a separate input surface geometry. The next step was to create a surface integrator that would properly query the skin BSDF to calculate the total outgoing radiance at all points. The method of sampling and integration that I designed was to have multiple camera rays shot out to a given surface point, and for each camera ray, a neighboring point on the same surface would be sampled and used as the point of incidence. For each of these sampled input points, every light source would be sampled according to the number of samples specified in the .pbrt file. This way, the total irradiance arriving at a single point of incidence on the surface could be approximated using the Monte Carlo sampling of the lights, and the diffuse reflectance could be approximated at the outgoing point (the point at which the surface intersects the camera ray) using the Monte Carlo sampling of the points of incidence.
Comments
My implementation unfortunately did
not produce the correct results. Assuming that my understanding of the
mathematics is not incorrect, I think I may have misunderstood something about
the way the integrators and sampling work. In any case, had I achieved the
results I wanted for the diffuse approximation, I would have moved on to
incorporate the single scattering term as well. We are including my code in our
submitted source; it does not affect the rest of the code, as long as the "skin"
material is not specified in any pbrt files. In general, I found that fitting
the concept of subsurface scattering into pbrt was rather difficult and
inelegant given the assumptions of the existing framework. My integrator
implementation is added as a special case in the DirectLighting surface
integrator class, as well as in transport.h/.cpp in the pbrt core. In order to
find neighboring points to sample, I created a SampleNeighborPoint method of the
shape class, which is trivially implemented everywhere but for the Triangle
class (because we knew that our face mesh would be modeled with a triangle
mesh).
Our goal was to render something that looked like this:


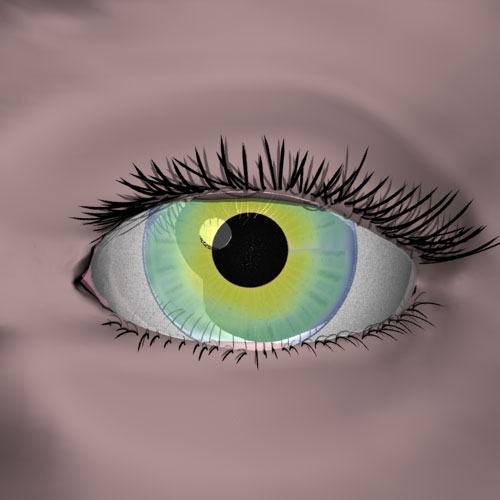
We rendered these:
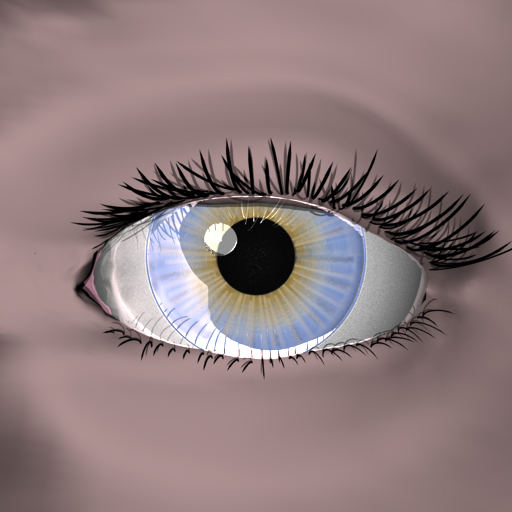
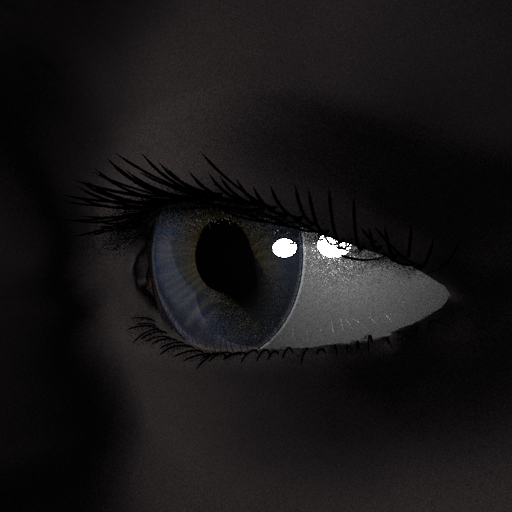

a) blue eye to demonstarte iris layering, b) a more artistic vision for the eye, c) eye rendered with the sunset environment map to show reflections
If we could have gotten subsurface scattering to work correctly, it probably would have looked softer and more realistic. But we think the results look decent, and we definitely learned a lot! If we have time, we will try to get the subsurface scattering working and see what happens. We'll be sure to send you some images if we do:)