Aperture Based High Dynamic Range Imaging
Mike Houston mhouston@graphics.stanford.edu
Background and Motivation:
One of the main problems with photography is that it is really difficult to capture the true feel of the environment, because the film has a limited dynamic range and the mapping from radiance to the brightness of a pixel or grain is non-linear. This is often most noticeable when shooting inside buildings. If you set the exposure too low, you can only manage to capture the portions of the scene that are very bright such as the windows and lights. If you set the exposure too high, you can see some of the dimmer portions of the room, but the brighter portions start to cause blooming and glare, and tend to wash out other portions of the image. A photographer has to think carefully about how to set the exposure to get the correct feel of the scene.
A solution to this problem was proposed in Mann and Picard’s “Being ‘undigital’ with digital cameras: Extending dynamic range by combining differently exposed pictures”. They proposed that one could capture a higher dynamic range by combining multiple images taken with different exposure values to recover a larger dynamic range. Debevec and Malik, and Mitsunaga and Nayar continue with the basic idea proposed in Mann and Picard but use different techniques for selecting pixel values for the HDR image and different methods for calibration.
All of the previous published work uses varying shutter speeds to capture exposure sequences. This method avoids changing depth of field effects and tends to make calibration easier because shutter speeds tend to be accurate and scene object to not change focus. But, what if we vary exposure by using aperture? What effects to we get? Can we combine varying aperture and exposure to get an even larger dynamic range?
For this project, I used a Nikon D1 and a Nikon CoolPix 995. The D1 is a prosumer level camera and the CoolPix 995 is a consumer level camera. The CoolPix 995 was the lowest end camera I could find with full manual control.
What Does Varying Aperture Do?
Let us pause for a moment and think about how depth of field relates to exposure. If we fix the shutter speed and only control aperture, when a scene gets brighter, we must close down the aperture, causing an extension in the depth of field. Under the same circumstances, as the scene gets darker, we must open up the aperture, causing a narrowing the depth of filed.
So, if we shoot an HDR sequence by varying exposure, objects that are brighter will have a larger depth of field than dimmer objects. If we focus at infinity, we expect this effect should be minimal over most of the image, but bright foreground objects should still be in focus. If we focus at closer ranges, we expect the depth of field effects should become more noticeable and both foreground and background. This should create some unique sequences.
Fun With Calibration:
If you take a look at all of the previous HDR work, they all have one thing in common: their papers overwhelmingly deal with calibration. Calibration is a VERY difficult thing. All of the methods presented in these papers deal with recovering the response curve from a sequence of images. The response of film to variations in exposure creates a characteristic curve. Each of the papers presents a different method for recovering the response curves.
Mann and Picard use search the images for values that correspond to fitting the curve: M = a + β Iγ. Where a is a basis parameter to measure dark noise, which can be found by taking a picture with the lens cap on, and b is set to an arbitrary constant. γ
is found by solving
a regression sequence M(I), M(RI), …, M (RnI). M(I) in image 1 produces M(RI) in image 2, and a pixel with brightness
M(RI) is found in image 1 that produces the brightness M(R2I) in the image 2 where I is unknown.
R is the ratio of exposure values between the two images. This model is very restrictive and cannot handle curves that do not match the equation.
Debevec and Malik propose an approach in which they use a sequence of images taken at precisely known exposures. This approach is less restrictive on the response curve and requires only that the function be smooth. The main disadvantage is that the exposure level must be precise. This makes using this method for aperture sequences difficult since aperture tends to not be very precise on cameras whereas shutter speed is generally pretty close to accurate. MKHDR uses this method and is therefore very difficult to use for aperture sequences.
Mitsunaga and Nayar proposed an even more flexible model where they take a series of images with “guessed” exposure values and create a response curve using a summation of polynomial functions. This is by far the most flexible system, but it has some problems with local minima. For example, if you guess to far away from the actual exposure values, you can get stuck at local minima. They make the claim that using the values off of the camera should be good enough to avoid problems. RASCAL uses this method and despite being very difficult to use, accomplishes building curves quite well.
Experiences with the cameras:
It is very difficult to find digital cameras that have full manual control. For this project, I used a Nikon D1 and a Nikon CoolPix 995. The D1 is a prosumer level camera and the CoolPix 995 is a consumer level camera. The CoolPix 995 was the lowest end camera I could find with full manual control. I only had a small memory card, and to shoot uncompressed images, I quickly ran out of space with both cameras. I tried shooting with minimal compression, but the final HDR images had noticeable “stair-steps” in them. My limited storage capacity limited the maximum dynamic range I could capture. I tried several times to lock down the tripod and remove the memory card to offload onto a PC, but was unable to prevent camera shake for the remainder of the sequence. Often the image alignment was difficult because of the various small rotations and translations of the camera. It would have been really nice to have a larger memory card and/or a laptop with a firewire plug to offload images.
Nikon D1: This is a high-end camera and has lots of features
I had to figure out how to turn off. The main disadvantage of this camera is the weight. Even on a reasonably heavy-duty tripod,
there was still a small amount of camera movement without a remote shutter
release. This camera also has a strange
orange-red hue in images. This was with
all white balancing and auto-exposure values turned off. Other people in the CS448A class using this
camera also noticed this behavior. There were also some images in which over-exposed pixels shifted to
green or blue. (See the church ceiling
and the church organ.)
Nikon Coolpix 995: This is a consumer level camera that is sometimes cumbersome to use. Shooting in auto-exposure mode is easy, but the interface for shooting in full manual is more difficult that it should be. This camera has a really strange response curve that created some major headaches. All images with correct exposures look fine and the calibration curve at that point looks good, but as you vary exposure up and down, you get odd curves. This camera also has strange aperture settings. I could never seem to get the lens zoomed to give me recognizable F-Stops. So, for the calibration and HDR image creation, I had to figure out the F-Stop difference from frame to frame. The HDR images produced with this camera and HDRShop do not look nearly as good as those done with the D1.
Experiences with the various software packages:
Given the amount of time spent in previous work on calibration, I was expecting calibration to be hard. Calibration turned out to be easy for one of the cameras I chose to use for this project and extremely difficult for the other.
MKHDR worked well on the D1, but really had a hard time producing good images from the CoolPix 995. The command line interface to MKHDR was sometimes tedious to use, as you had to feed the program a file describing the exposure settings for the camera. For MKHDR to work with the CoolPix 995 in aperture mode, I had to play with the aperture settings I fed to the program. I found that I had to manually vary the aperture settings in the file +/- 10% from what I read from the camera to get a good picture out. This seems to fit with the nature of the algorithm that MKHDR uses.
RASCAL produced good calibration curves for both cameras, but was extremely difficult and time consuming to use. It doesn’t have an automated process like MKHDR or a semi-automated process like HDRShop. You have to go through 5 steps, but only 4 if you do not need to do image alignment, to make it produce HDR images. Each step is a separate tool. The images and calibration were not noticeably better than those produced with HDRShop after a little tweaking.
HDRShop was a good compromise that was able to easily calibrate for the D1 and did a reasonable job after many iterations for the CoolPix 995. I could not find out which algorithm was used, but based on the image results and the calibration curves, it seems that it is more like Mitsunaga and Nayar’s method, or a heavily reworked version of Debevec and Malik’s method. HDRShop was used to compute the calibration curves and the HDR image for this project.
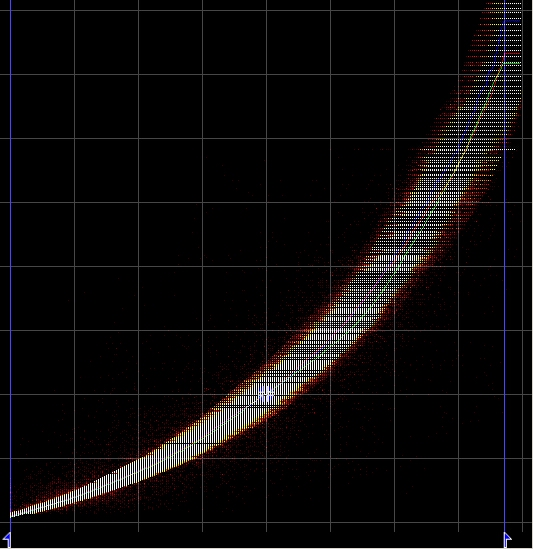
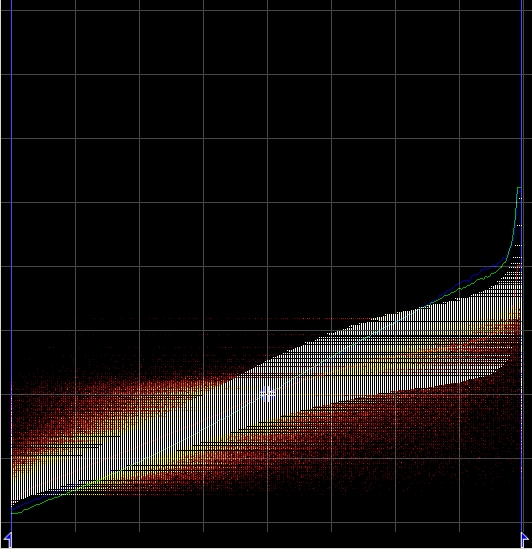
Calibration Results:
These are the calibration results for each camera using HDRShop. The white horizontal lines represent the variance of the pixel values from the curve. I will present representative curves from each camera. In actuality, each image sequence has its own calibration curve.
Nikon D1: This looks a lot like a normal film response curve. The variance in pixel values widens as the exposure increases. There is a minor separation in the curves of each channel. Part of the separation may be evidence of the orange-red shift in exposure. You can notice that the red channel tracks slightly higher than the blue and green in the middle exposure values.
Nikon CoolPix 995: This curve is a bit of a mess even after a few thousand iterations. This is a little concerning. It’s unfortunately a little hard to see, but if you look at lower exposures and higher exposures, you’ll see a distinct separation in the color curves.
Aperture HDR Results:
All results were produced using Paul Debevec’s HDRShop. The image displayed is the best exposure balance I could achieve. Click on the image to get the HDR version. You’ll need and HDR viewer such as HDRShop. Try looking at the images while adjusting the exposure settings (+/- in HDRShop) or try your favorite tone-mapper.
Stanford Memorial Church – East Side:
|
Camera: Nikon D1 – 18mm lens |
|
Shutter: ½ second |
|
Aperture: 3.2, 3.5, 4, 4.5, 5, 5.6, 6.3, 7.1, 8, 9, 10, 11, 13, 14, 16 |
|
Focus: Infinity |
Lots of dynamic range. Notice the preservation of detail in the stained glass and ceiling work.
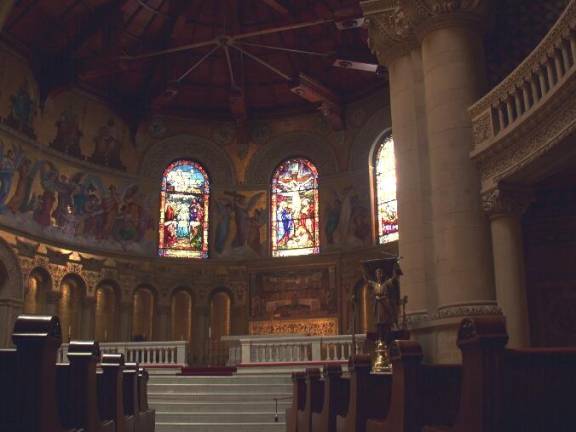
Stanford Memorial Church – Central Altar:
|
Camera: Nikon D1 – 18mm lens |
|
Shutter: ¼ second |
|
Aperture: 3.5, 4, 4.5, 5, 5.6, 6.3, 7.1, 8, 9, 10, 11, 13, 14, 16, 18 |
|
Focus: Infinity |
Notice that the bright tops of the pews are in focus and the darker portions are not.
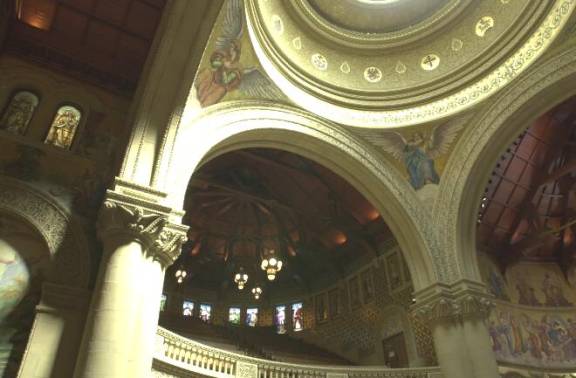
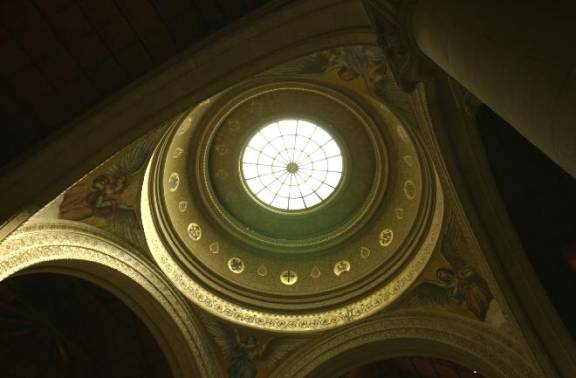
Stanford Memorial Church – Ceiling:
|
Camera: Nikon D1 – 18mm lens |
|
Shutter: 1/10 second |
|
Aperture: 3.2, 3.5, 4, 4.5, 5, 5.6, 6.3, 7.1, 8, 9, 10, 11, 13, 14, 16 |
|
Focus: Infinity |
Notice the slight green hue. It’s hard to tell if this is caused by the D1 or by a calibration error in HDRShop. Look at the two angels and the ceiling work as you vary exposure.
Stanford Memorial Church – Organ:
|
Camera: Nikon D1 – 18mm lens |
|
Shutter: 4 seconds |
|
Aperture: 3.2, 3.5, 4, 4.5, 5, 5.6, 6.3, 7.1, 8, 9, 10, 11, 13, 14, 16 |
|
Focus: Infinity |
This is my favorite set, and it required the most patience. I had to shoot this sequence a total of 8 times to get the balance correct and to deal with several people taking flash photography or bumping into the tripod. The orange-red shift in the D1 actually complements this scene. In the full resolution version, you can see a shift towards blue around the lights. Also, after shooting this sequence several times, the D1 got noticeably warm and shut off momentarily. Just a word of caution for taking long exposures.
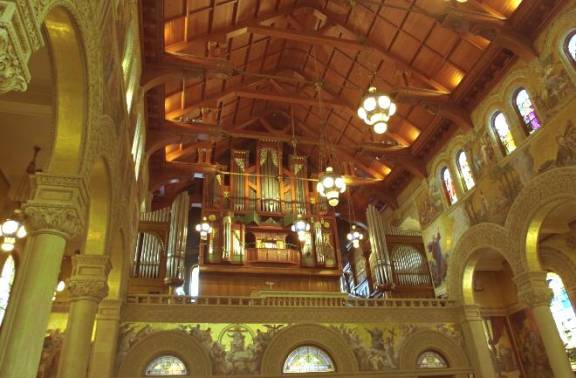
The full resolution version of the organ
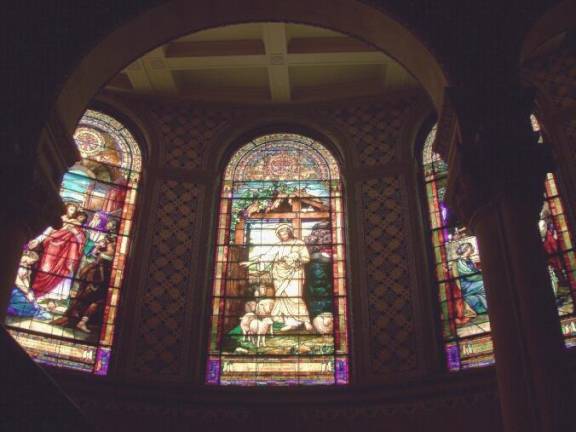
Stanford Memorial Church – West Stained Glass:
|
Camera: Nikon CoolPix 995, widest angle |
|
Shutter: 1/15 second |
|
Aperture: 2.6, 3.0, 3.3, 3.7, 4.2, 4.7, 5.3, 6.0, 6.7, 7.5 |
|
Focus: ~30ft. |
Notice the preservation of the detail in stained glass as well the ceiling and on the wall.
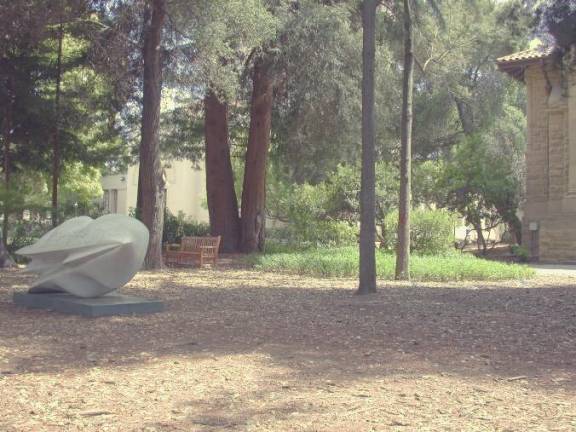
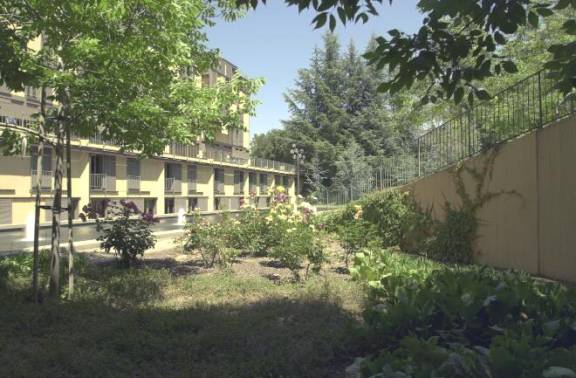
Forest – Serra St & Galvez St., Stanford:
|
Camera: Nikon CoolPix 995, widest angle |
|
Shutter: 1/125 second |
|
Aperture: 2.6, 3.0, 3.3, 3.7, 4.2, 4.7, 5.3, 6.0, 6.7, 7.5 |
|
Focus: ~50ft. |
Notice how surreal this image looks. It’s hard to make out the aperture effects, but if you look closely you’ll notice that the brighter foreground and background object are in focus while some of the dimmer mid distance objects are not. If you can’t see this, try looking at the trees to the right and then the bright plants on either side of them.
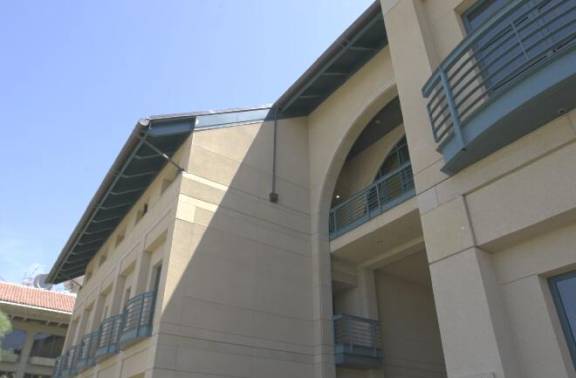
Green Earth Science Building, Stanford University:
|
Camera: Nikon D1 – 18mm lens |
|
Shutter: 1/160 second |
|
Aperture: 3.2, 3.5, 4, 4.5, 5, 5.6, 6.3, 7.1, 8, 9, 10, 11, 13, 14, 16 |
|
Focus: ~50ft. |
An outdoor shot on a windy day chosen on purpose to avoid moving leaves. Notice the hard edges of the shadows and the entryways into the building.
Terman Engineering Center, Stanford University:
|
Camera: Nikon D1 – 18mm lens |
|
Shutter: 1/160 second |
|
Aperture: 3.2, 3.5, 4, 4.5, 5, 5.6, 6.3, 7.1, 8, 9, 10, 11, 13, 14, 16 |
|
Focus: Infinity |
Another exercise in patience: it was a little gusty the day I took these. I occasionally had to wait for the leaves to stop moving. One interesting note about this image is the moving water. Despite the fast shutter speed, combining multiple images creates a slight “cotton-candy” effect on the fountains.
Studio 2 Room, Stanford University:
|
Camera: Nikon CoolPix 995, widest angle |
|
Shutter: 1/2 second |
|
Aperture: 2.6, 3.0, 3.3, 3.7, 4.2, 4.7, 5.3, 6.0, 6.7, 7.5 |
|
Focus: Infinity |
This image has an artificially high dynamic range. I carefully turned lights on and off to create the correct lighting. The calibration for this image was very difficult and seems to have lost some contrast when building the HDR.
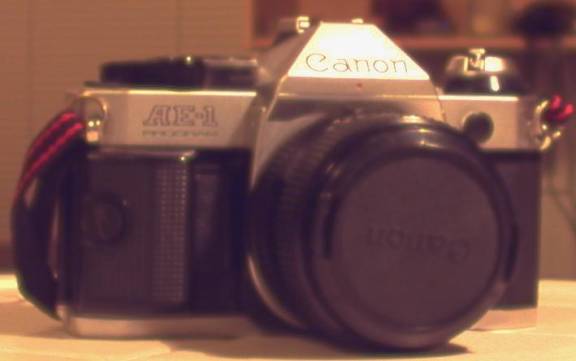
Up close Cannon AE-1:
|
Camera: Nikon CoolPix 995, mid-range angle |
|
Shutter: 1/15 second |
|
Aperture: 2.6, 3.0, 3.3, 3.7, 4.2, 4.7, 5.3, 6.0, 6.7, 7.5 |
|
Focus: ~1ft |
This is an artificial image trying to show that brighter things will end up in focus. The “Canon” logo on the top of the camera is almost in focus, at least better focus that the things around it. Notice that the tile is in focus and the bright parts on the camera are in focus, but darker things in-between are not.
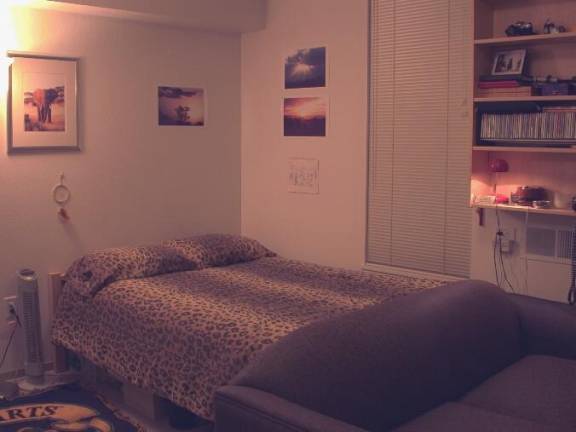
Stuffed Animal:
|
Camera: Nikon CoolPix 995, widest angle |
|
Shutter: 1/8 second |
|
Aperture: 2.6, 3.0, 3.3, 3.7, 4.2, 4.7, 5.3, 6.0, 6.7, 7.5 |
|
Focus: 3ft. |
Notice the variation in focus across the bed and the fur of the leopard with brightness.

General Rules For Taking HDR Sequences (Not Definitive!):
- Bring along a laptop:
- Unless you have a large memory card, you will need a way to offload images.
- You can build HDR sequences on the spot to see if you need to reshoot.
- A really good tripod and (maybe) a remote shutter release:
- You need a tripod that is very stable. Even on the heavy-duty tripods I was using, with a heavy camera like the Nikon D1, there is a few pixel shake between frames when manually depressing the shutter. With light cameras and a good tripod, you probably do not need a remote shutter release. I would recommend the use of a remote shutter release on heavy cameras.
- Lots of patience:
- If you are shooting outdoor sequences, you need to wait for the conditions to stabilize, i.e. no wind or fast moving clouds
- Shooting tourist spots is problematic since you will have to deal with other photographers (most likely) shooting flash photography.
- Find a scene with high dynamic range in the first place:
- First, find a scene you really like.
- Check to see what the dynamic range is like.
i. Using a light meter, hand-held or the one in the camera, flip through the aperture and shutter settings and see what the exposure offset is. The larger the shift in exposure offset, the more dynamic range you have. If there is only a small shift, the effect of doing HDR will be minimal, but possibly still very nice.
- Camera setup:
- Make sure you setup your tripod in a place where you or others will not bump into it.
- Frame your shot and lock down your tripod settings.
- Set camera to full manual mode and turn off ALL auto-exposure features, i.e. auto white-balance, auto-bracketing, etc.
- Set camera to take uncompressed images! If you must use compression, use the lowest compression possible and be prepared for some error when building the final HDR image.
- Set exposure:
i. For an aperture sequence, select the middle most aperture setting you will be using in your sequence. Then, adjust your shutter speed to match the exposure reading of your light meter.
ii. For a shutter sequence, select the middle most shutter speed setting you will be using in your sequence. Then, adjust your aperture to match the exposure reading of your light meter.
iii. You can always change your initial selection to match the effect that you want. For example, if you want a sequence that better shows darker regions of the image, you can set your initial exposure up or down.
- Take your sequence:
- Start at one end of your exposure sequence, i.e. largest aperture, and shoot at small exposure intervals, i.e. ½ F-Stop or finer, all the way to the other end of your sequence.
- Watch for movement in your frame or flash photography. If anything changes from frame to frame, you’ll have to reshoot. It is really important to be vigilant about this, or else you’ll have to reshoot.
- For the cleanest sequences, replace the lens cap and reshoot the sequence with the lens cap ON. This can be used later for dark noise subtraction.
- Build your HDR:
i. Use the package’s calibration features to build a curve.
ii. One curve generally isn’t good enough for all sequences. I recommend building a curve per sequence. At the least, you need to build a curve for each exposure jump. For example, in the case of aperture sequences, you should calculate a curve for every step or two in shutter speed. This is most important for long exposure where there is increased noise in the images.
- Build the sequence using the above tools with the response curve you just build.
- Take a look at the result and decide if it is acceptable. If not, decide how you want to change the image balance as described in 5e, or whether there is enough dynamic range in the scene to warrant taking the sequence
Conclusions:
Aperture HDR sequences have some interesting effects. However, it is a little difficult to visualize what the final HDR image will look like when you pick your scene. The camera image and the forest image show the effect of different depths of field per pixel. In the camera image, it is very noticeable that the “Canon” logo is in better focus than the rest of the camera and the tile in front of the camera is also in focus. This is an interesting effect that we have two portions of the image with different distances that are in focus, but things between them are not. In the forest image, the effect is not as direct. The image is given a somewhat surreal appearance and the depth of field changes around brighter objects. If you take a look at the trees they are in focus, but so is the very bright background behind them.
To get maximal range out of a camera, you can combine aperture variation with shutter variation. For example, on a Cannon AE-1 with a 50mm lens, you can get a 12 F-Stop range varying shutter and a 9 F-Stop range varying aperture. Combining the two will give you a 21 F-Stop range. The caveat is that to have a balanced sequence, the scene has to be perfect so you can set the “normal” exposure as the middle shutter speed and middle aperture size.
Capturing HDR sequence is really hard. To get the sequences above, 160 images, I had to shoot over 1600 images in total. Some sequences were rendered useless because something in the scene moved or another photographer set off a flash. Other sequences were trashed because I had taken pictures in compressed mode. Even though I had set the compression level to its least compressed mode and each still image looked fine, the final HDR image had “stair-step” jpeg artifacts. Some sequence just did not have good balance, either I set the starting exposure point too high or too low.
Calibration is hard. Most of the images taken with the D1 were very easy to calibrate since the camera has a nice response curve. However, all of the images taken with the Nikon CoolPix 995 were very difficult to calibrate.
Make sure you use a good camera and are patient!
Future Work:
It’s surprisingly difficult to capture HDR sequences. I spent a great deal of time reshooting because the calibration was difficult, I poorly chose a scene with low HDR, and/or there was interference from other photographers. It would be nice to have everything done in one-shot like in a manner proposed in Nayar and Mitsunaga “High Dynamic Ranger Imaging: Spatially Varying Pixel Exposures.” You would lose the ability to get depth of field effects, but it would make the casual use of HDR possible. Another option is to have cameras have a mode for HDR capture that will figure out how many F-Stops to vary between frames and they do the image combination internally using the cameras pre-programmed response curve.
If we combined overlapping shutter and aperture sequences, would it be possible to reduce noise in ways that just shooting one type of sequence multiple times could not? If we had both sequences, could we selectively choose between them to get the desired amount of depth of field? I think these ideas have interesting potential.
Displaying HDR images is still a problem. It is a little tough to get a feel for the environment by manually changing the exposure up and down. Although there are many tone-mappers available, none seem to work on all types of images. It would be nice to categorize what algorithms to use in different situations.
References:
P. Debevec and J. Malik. Recovering High Dynamic Range Radiance Maps from Photographs
S. Mann and R. Picard. Being ‘Undigital’ with Digital Cameras: Extending Dynamic Range by Combining Differently Exposed Pictures
T. Mitsunaga and S. Nayar. Radiometric Self Calibration