Final Project
CS 348B: Image Synthesis Techniques, Spring 2003
Rendering Realistic Animal Fur
| Michael Turitzin turitzin@stanford.edu |
Jared Jacobs jmjacobs@stanford.edu |
Introduction
Our main goal for this project was to create images of artificial scenes including convincing animal fur. (Feel free to review our project proposal.) We primarily followed the strategy that Kajiya and Kay describe in "Rendering Fur with Three-dimensional Textures" [1], but we also found the work of Neyret [3] and Perlin and Hoffert [4] useful.
The premise of Kajiya and Kay's method is that modeling each individual strand of hair on a furry surface using traditional geometry, such as a polygonal mesh, is too complex and time-intensive both for the 3D artist and for the rendering system, not to mention the aliasing issues that detailed microgeometry presents. Instead, they propose representing patches of fur as light-scattering volumes with special properties. They call this basic unit of fur a texel, short for three-dimensional texture element.
To achieve our goal of rendering realistic animals, we enhanced our fur model so that it could look brushed or messy, have its color vary across surfaces, and have different lengths on different parts of the animal.
Our Method
The first stage of our project was implementing the features Kajiya and Kay describe in their paper [1]. This involved first constructing fur volumes (each corresponding to one texel) by extruding the triangles and quadrilaterals that comprise a polygonal mesh along their vertex normals. Since the edges of these fur volumes are not necessarily planar, we represent them as bilinear patches. Initialization of texels (three-dimensional arrays of density, tangent, and color information), occurs when the rendering process begins. Each texel represents a patch of fur with properties determined by input parameters. Ray segments that pass through fur volumes in the scene are mapped to texel space for the lighting calculation.
To compute how fur volumes transmit and scatter light, we use a Monte Carlo approximation: our implementation takes random stratified samples along each camera ray at regular intervals inside fur volumes. At each sample point, additional light rays are shot toward each light source to determine how the fur and other objects in the scene affect the irradiance arriving at the sample point. The lighting calculation uses a cylindrical model parameterized by the hair's direction, density (an approximation of projected area), and color at the sample point. The fact that fur shadows itself and other objects dramatically enhances realism.
The following images are renderings of a single polygon with its derivative fur volume. They provide an idea of the fur types that our implementation can model.

A close-up of generic, fairly thick fur. Note the
self-shadowing
of the fur and shadows on the quadrilateral base.
Vertex normals determine the direction of hair growth on furry surfaces. We provide a facility for adding a consistent offset or random perturbations to these normals. Noise greatly increases the life-like quality of rendered fur.

This is a good example of a rug-like fur. The normals
at each vertex have been perturbed to create a wavy appearance.
By varying the parameters that define a fur texel, such as voxel grid resolution, optical density, and color noise, you can create many different kinds of fur.

A great example of monkey-like fur! A high-resolution
texel
results in very fine fur. Lowering the optical depth makes
the fur quite transparent and soft-looking.
The option to superimpose multiple coats of fur on one surface allows us to simulate the thick undercoat and longer, thinner, sparser overcoat common to many animals.

This triangular fur volume illustrates two coats of fur.
Fur color is defined either by material color or by a two-dimensional texture map. In the latter case, texture coordinates must be supplied for each vertex in the model. Each fur strand takes on the color of the surface at its root.


Two fine examples of leopard fur. These two texels use
a fur texture generously provided by a random fur-selling website.
Textures can be fun to experiment with even though they might not represent realistic animal fur.

Matt generously provided this texture for us to test
LRT's texturing functionality.
Feature Summary
- Automatic generation of fur volumes over arbitrary triangle/quad meshes
- Texel definition files for extensive control over fur appearance
- Multiple superpositioned texels per fur volume
- Control of fur length for each furry surface
- Fur color control using material properties or a texture map
- Normal biasing and perturbation for combed and messy fur.
Usage Instructions
Here we describe how to operate our fur rendering system. Fur rendering is controlled through two input mechanisms: the .rib file (new options will be outlined) and the .tex file, which specifies texel properties.
First, the texel input file. Each texel is defined by a set of input parameters. The actual texel volume is generated (very quickly) at run time for ease of use, but the generation is controlled by these parameters. Texel description files have the following format:
dimx = [voxel resolution in the x dimension (u)]
dimy = [voxel resolution in the y dimension (v)]
dimz = [voxel resolution in the z dimension (up)]
hairdensity = [density of hairs on texel base (0..1)]
hairlength = [length of hairs (0..1)]
hairlengthnoise = [max magnitude of random hair length noise]
colornoise = [max magnitude of random color noise]
opticaldepth = [fur opacity coefficient (0..INF)]
These parameters are fairly self-explanatory. The optical depth value should vary with the scale of the scene as well as the sample segment length (described below).
Fur properties also come from the .rib file that LRT parses. The direction of hair growth is controlled by vertex normals. If these are missing, our implementation will generate facet normals. It also ensures that all faces sharing a vertex use the same normal at that vertex to avoid discontinuities in the fur that look like seams.
When it comes to texture mapping, our implementation expects (u,v) parametric coordinates to be provided in the standard format for each mesh vertex. It uses them as (s,t) indices into texture space.
Our new integrator, imaginatively named the "fur" integrator, requires the following syntax:
SurfaceIntegrator "fur" "integer maxdepth" [5]
                        "float samplesegmentlength" [0.01]
The maxdepth parameter specifies the maximum number of times rays will bounces off of specular surfaces (as in the Whitted integrator), and samplesegmentlength controls the length of the sample segments used in calculating light scattering and transmittance through fur volumes. The values above are typical values we used while rendering our scenes.
Next comes the new material we have defined: the "fur" material! The fur material must be used for any furry surface in the scene. Its syntax is as follows:
Surface "fur" "string texels" ["furs/undercoat.tex furs/overcoat.tex"]
              "string texturename" ["textures/leopardfur.tif"]
              "float normalnoisebasex" -0.4 "float normalnoiserangex" 0.8
              "float normalnoisebasey" -0.4 "float normalnoiserangey" 0.8
              "float normalnoisebasez" -0.4 "float normalnoiserangez" 0.8
              "float normalscale" 0.5
Only the texels parameter is required in the surface definition. Note that any number of texels can be used in a material. The texturename string can specify a texture for fur coloring. The normalscale parameter controls fur length. The other 6 parameters, also optional, control bias and random noise, which we add to each normal before renormalizing and scaling them.
Obstacles and Pitfalls
We encountered many difficulties during the course of this project. We solved some, we worked around some, and others just proved to be a huge hassle. Here are some of the major ones (because we like complaining):
- It took us a while to get texels rendering properly. Kajiya and Kay's paper can sometimes be a little vague, and it took quite a bit of re-reading to understand every aspect. There are many parameters that can be tweaked for each texel and scene, so starting out was daunting.
- Creating models with properly sized polygons and smooth vertex normals was a very painstaking task. The polygons of a model cannot be too small or too numerous, and they must be roughly the same size, at least locally, since each is mapped to its own texel. It was difficult to find models that fit these criteria, and it didn't help that neither of us had a commercial modeling program! Once we had models, we needed them to have smooth vertex normals (that is, the normals at vertices shared by adjacent polygons needed to be the same for each face). The modeling programs we used all had quirks about them that made generating these normals very difficult. Finally we needed to convert our models to .rib format so that LRT could read them. We ended up converting some models using the free modeling programs we had and writing multiple conversion utilities ourselves. A utility was also written to aid in smoothing vertex normals for the resulting .rib files.
- As our scenes became more complex and of higher quality, our rendering times began to grow rapidly. We certainly could have implemented more optimizations, but there was not much time for that. Consequently, the iterative process of checking results and rerendering became very slow near the end of the project. I'm sure this issue is common among many projects.
- While it was easy to get something rendered, it was often difficult to produce renderings that looked believably like fur. Doing so required much parameter tweaking, rendering and rerendering. It became clear quickly that there is a fine line between "fur" and "rubber spiky things" that could be crossed, but delicately so, through changing transparency, adding multiple texel coats, adding texture, noise, and so on.
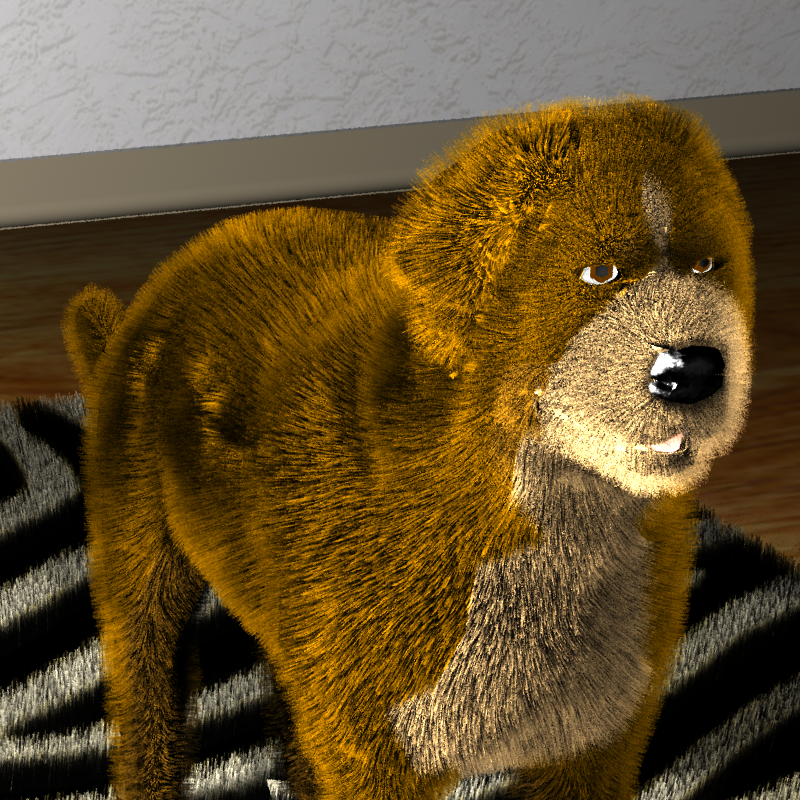
Additional Images

We've used our fur rendering system to generate a leopard-fur rug! Note the nice wavy quality of the fur (achieved using perturbed normals) as well as the soft quality of the texel used. Simply marvelous!

Here, in lieu of a real leopard, we have generated a sphere covered in leopard fur! Two coats of fur were used in this image. Note the awesome effect the lighting has on the bright and dark portions of the sphere. We see in this image that the fur has a porcupine-like, unrealistic spiky quality. This will be addressed in the next image...

Now, a sphere covered in "messy" leopard fur! Note how organic and life-like the fur has suddenly become, just through random perturbations in the surface normals.
References
[1] J. Kajiya and T. Kay. Rendering Fur with Three-dimensional Textures. SIGGRAPH Proceedings, 1989, pp. 271-280.
[2] J. Lengyel, E. Praun, A. Finkelstein, and H. Hoppe. Real-Time Fur Over Arbitrary Surfaces. Symposium on Interactive 3D Graphics, 2001, pp. 227-232.
[3] Neyret, Fabrice. Synthesizing Verdant Landscapes Using Volumetric Textures. Eurographics Rendering Workshop, 1996. pp. 215-224.
[4] K. Perlin and E. Hoffert. Hypertexture. SIGGRAPH Proceedings, 1989, pp. 253-262.