Assignment 8 - Subdivision Surfaces
Due Date: Thursday March 15th, 11:59PM
Questions? Check out the Assignment 8 FAQ and discussion page.
In this assignment you will implement subdivision of a triangle mesh using a technique referred to as loop subdivision. Conceptually, this is very simple. In each stage of subdivision, every triangle of in the mesh is split into 4 triangles and every edge in the mesh is split into two edge connected by a new vertex. The difficulty in this assignment arises from the need to efficiently manipulate a mesh data structure to perform successive subdivision operations. There will be more coding involved than with previous assignments.
Download and build the starter code
1. Begin by downloading the Assignment 8 starter code and latest version of the libST source here. Libst has changed in this assignment. We've added a new class STVector, that should assist you with operations on 3-vectors. You will be performing many such operations in this assignment.
2. Build the code. In this project, you will be modifying assignment8/subdiv.cpp. In the assignment8/ subdirectory we have placed two sample meshes tetra.geo (a tetrahedron) and sphere.geo (a sphere) for you to test your code on. Run the program using the command subdiv mymeshfilename.geo and you will see an image of the mesh rendered in wire frame on your screen.
Notice that we've added some mouse controls that move the camera in this assignment, making it easier to view a 3D object. Dragging while holding the left mouse button rotates the camera around the object. Dragging with the right mouse button depressed zooms, and dragging with the center button depressed will dolly (translate) the camera.
In this assignment, the 's' keys toggles between smooth shaded and wireframe display mode (smooth shading is only possible when normals are present). The "+/-" keys increase and decrease the number of subdivisions to perform on the base model.
Mesh Representation
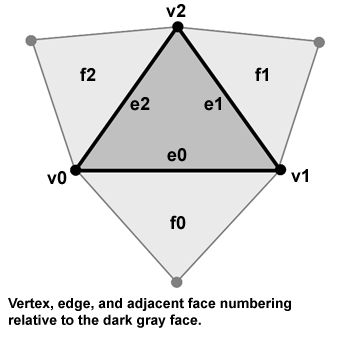
The most important part of this assignment is understanding how the mesh is represented. We will be working with triangle meshes in this assignment, so each face contains exactly three vertices: They are labeled v0, v1, and v2 in the diagram below. In this assignment we will only be working with 'closed' meshes, so each face is connected to another face on each of its three edges. The adjacent faces are labeled f0, f1, and f2. Lastly, we've labeled the edge between vertex i and (i+1) mod 3 edge i. Since the mesh is closed, every edge will have a face on both sides of it.

Take a close look at the SubdivFace class defined in subdiv.h which represents a triangle face. You will see fields in this structure corresponding to points to 3 vertices, pointers to 3 adjacent faces. SubdivVertex, also defined in subdiv.h, represents mesh vertices. Vertices contain information about their position, a pointer (adjFace) to one face that uses the vertex, and a flag describing whether or not the vertex is extraordinary. Recall from lecture that extraordinary vertices are vertices that DO NOT have valence 6.
Before going further, you should take a look at and understand the following useful routines in SubdivFace:
SubdivFace::VertexIndex
SubdivFace::NextFace
SubdivFace::NextVertex
SubdivFace::OtherVertex
Then understand how the complete mesh is represented in the SubdivSurface class. Original face and vertex data is read from disk in SubdivSurface::LoadGeometry. SubdivSurface::ProcessBaseGeometry then analyzes the geometry information to determine adjacent faces as well as to determine which vertices are extraordinary. The resulting mesh with face adjacency information is then stored in mOrigFaces and mOrigVerts.
Lastly, take a look at the implementation of SubdivSuface::ProcessBaseGeometry and figure out how it finds adjacent faces. You will be asked a question about this later.
The finer resolution mesh after subdivision is stored in mSubdivFaces and mSubdivVerts. The following section describes how that mesh is computed.
Mesh Subdivision
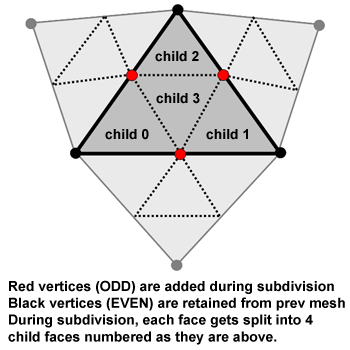
When a face is subdivided, the face is split into 4 faces as shown below. These faces are referred to as child faces of the original face. Notice that the SubdivFace structure contains pointers to child faces. Also notice that subdivision creates a new mesh that contains all the vertices of the old mesh as well as a new vertex placed on every edge of the old mesh. The new vertices are called ODD vertices and are marked in red below. The old vertices carried over from the coarser mesh are denoted in black. They are called EVEN vertices. The childVert pointer of a SubdivVertex points to the EVEN vertex in a finer mesh that corresponds to the same mesh vertex. Maintaining this child information is necessary to rebuild topology quickly after a subdivision. Your implementation will need to properly set childVert pointers while subdividing.

Mesh subdivision is performed in SubdivSurface::ComputeSurface. This function is defined to perform nLevels number of subdivisions on the original mesh read from disk. In the start code it is only partially implemented. You will complete the implementation in this assignment.
Step 1: Implement SubdivVertex::GetAdjVertexPositions
You need to implement the GetAdjVertexPositions method on the SubdivVertex object. This method should write the positions of all vertices adjacent to a vertex into the provided array. At the end of the call, the length of the vector 'positions' should be the valence of the vertex.
'Note 1: You must implement this method using an algorithm that only touches vertices and faces adjacent to the vertex. Searching through the mesh is not allowed'.
'Note 2: This method produces an array of STVectors instead of STPoint3D objects. We did this because STVectors are more convenient for performing math, since just like STColors, all the normal mathematically operations are implemented as overloaded operators for STColors'
Converting a 3D point to an STVector:
STPoint3D p;
STVector v(p);

Converting an STVector to a point.
STPoint3D p = v.ToPoint3D();

Other interesting functions that might be useful to you in this assignment:

// compute the cross product of v1 and v2
STVector v3 = Cross(v1, v2);

// compute the dot product of v1 and v2
float d = Dot(v1, v1)

// normalize the vector v1 and store the result in v2
STVector v2 = Normalize(v1)
Tip: You'll probably want to use the STL vector method push_back to add items into the vector.
Step 2: Moving Even Vertices
The first thing the subdivision algorithm must do is allocate space for the faces and vertices of the new finer resolution mesh. The code to allocate the new faces and new EVEN vertices is already done for you. However, the even vertices in the new mesh need to be moved to new positions. The new position of each even vertex is computed by a linear combination of its parent vertex in the old mesh, and all the vertices adjacent to the parent vertex in the old mesh.
let 'V' be old vertex
let 'Vnew' be the child of V in the new mesh (Vnew is an even vertex)
let 'valence' be the valence of V.
Vnew.pos = (1 - beta * valence) V.pos + sum_over_i( beta * neighbor_of_V[i].pos);
SubdivSurface::beta(valence) is a provided method to compute the weighting factor beta for a vertex with any valence. Note also that if the vertex has valence six, beta(6) = 1/16. You might want to hard code this in your code for efficiency. Please implement this linear combination in the method SubdivSurface::PositionFromOneRing. Recall that in the previous step you implemented a routine that found all the vertices surrounding a vertex. You should use that routine to find the vertices to pass to SubdivSurface::PositionFromOneRing.
At this time, should also fill out the adjFace pointer on all the even vertices of the new mesh.
Step 3: Create Odd Vertices
You now need to allocate and add the odd vertices to the new refined mesh. For each edge in the mesh, you'll need to create a new vertex. A logical way to do this is to loop through all edge of all faces. However, be careful not to add an edge twice. The recommended way to do this is to store all new vertices created in a map (indiced by their edge) and to verify that the edge has not yet been split before splitting the edge.
The formula for computing the position of the new odd vertex is a linear combination of 4 vertices.
Let v0 and v1 be the vertices defining the edge
Let v2 and v3 be the vertices of the two triangles sharing the edge, but are not on the edge.
Then Vnew.pos = 3/8 * (v0 + v1) + 1/8 * (v2 + v3)
Step 4: Rebuilding Topology: Finding Adjacent Faces in the Subdivided Mesh
Iterative subdivision will require the newly created fine mesh to have complete face adjacency information just like the original base mesh. In this step, for each child face allocated, you'll need to set the adjFace pointers. This must be done by only inspecting the faces and vertices immediately surrounding a face. See hints below.
Step 5: Rebuilding Topology: Find Vertex Pointers
The new faces from subdivision remain uninitialized. In this step, for each face you will need to make the verts pointers to point to the appropriate vertex structure. Note that this could be either one of the odd or even vertices of the new mesh. Again, you should only havfe to scan the immediately surrounding vertices and faces of a face to perform this operation. See hints below.
Step 6: Computing Normals
We desire information about the normal of the subdivided surface in order to perform smooth shading. At the bottom of SubdivSurface::ComputeSurface we've provided you some code to compute tangent vectors s and t to every vertex in the model. You should be able to easily compute a normal from the tangent vectors.
Some Tips
If you understand the following statements you should be able to write very efficient code in this assignment.
- Vertex number X of child face number X is vertex X of the parent face.
- Child face number X of parent face F will always touch vertex number X of F.
- Child face number X will always border child 3's (X+1)th edge.
- Child face 3 will always boarder child X's (X+1) edge.
Make sure your normal is in fact normalized. See the Normalize function in STVector.
Submission Instructions
We would like the following items to be placed in a zip file called LastnameFirstnameAssgn8.zip as handin for this assignment.
Your modified copy of subdiv.cpp. It is okay to handle in other files, like subdiv.h if you modified them as well.
- Answers to the following questions:
What does the function SubdivFace::VertexIndex compute?
Describe the algorithm that SubdivSurface::ProcessBaseGeometry uses to compute face adjacency from only the face and vertex data loaded off disk.
We recommended that you special case the value of beta to be 1/6 when vertices are ordinary. Why do you think this is the case? Is it likely to have vertices of valence 6? None of the sample meshes feature valence 6 vertices in their data files.
- Our data structure has faces storing pointers to vertices instead of having the vertex data stored directly within the face structure itself. What is the advantage of representing the mesh this way?
Please email this zip file to cs148-win0607-staff@lists.stanford.edu before the deadline. Please make the subject line of this email "CS148 Assignment 8 Handin".
Grading
- 1 point: code has bugs or does not subdivide properly
- 2 points: code functions correctly, but uses naive search to find topology information
- 3 points: code functions perfectly (including performance), incorrect answers to some questions
- 4 points: code functions perfectly (including performance) + correct, clear answers to answers