Homework 1: Lighting Design in PBRT
Due: Thursday April 12th, 11:59PM
Questions? Need help? Post them on the Assignment1Discussion page so everyone else can see!
Please link to your final assignment1 writeup wiki page from Assignment1Assignments.
Description
This assignment is designed to get you acquainted with compiling and using pbrt, the physically-based rendering system you will use throughout this course. Along the way you will learn a little about lighting design. Your goal should be to get comfortable with the software by rendering several test scenes and reading the beginning chapters of the textbook. pbrt has been developed and tested extensively on Linux, MacOS, and Windows. Feel free to use whatever platform you desire.
Step 1: Install pbrt
All students should have a personal copy of pbrt, which comes with the text for this class. However, instead of installing pbrt from the CD-ROM, we strongly suggest that you download the latest copy of the software from the www.pbrt.org web site. (Please note: Students planning to build and run pbrt on the Sweet hall 'myth' Linux machines should obtain pbrt from the course directory: /afs/ir/class/cs348b/pbrt/pbrt1.02.cs348b.tar.gz). This archive contains modifications to the build process to allow pbrt to build correctly on these machines). Instructions for setting up pbrt on the various platforms is available at PBRTInfo.
Step 2: Render First Image
Once you have successfully compiled pbrt, you will render your first image. Download the pbrt scene file and head model located here (also available at /afs/ir/class/cs348b/assignments/assignment1). To render the image, from within the directory containing a copy of the scene file, type: pbrt lighting.pbrt. Rendering the scene will take some time, and pbrt will print out statistics of the rendering process to the screen as well as output the image file lighting.exr.
Congratulations, you've rendered your first image with pbrt! You can view the EXR file directly using imageview (Windows, MacOS) or first convert it to a TIFF file using pbrt's exrtotiff utility.
To convert the EXR file to a tiff use the command: exrtotiff lighting.exr lighting.tiff
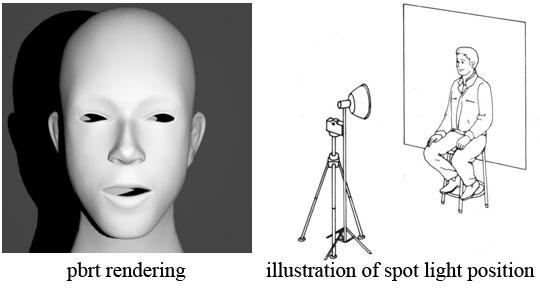
A correctly rendered image is shown on the left half of the figure above. In this scene, the camera is pointed directly at the model of a face. A single spotlight shines on the face from behind the camera and slightly off to the right, casting a hard shadow onto the wall behind the model. The location of the camera and spotlight in this scene is illustrated on the right.
Step 3: Experiment With Lighting
Photographers use a number of light sources to illuminate a subject in a pleasing manner. In this assignment you will manipulate the lighting in the scene to create several images using pbrt. Try your best to imitate the provided renderings, using the illustrations as hints on where to position the light in the pbrt scene. In your final submission you will hand in a zip file containing each of your renderings and the scene files you used to create them (hand-in instructions are provided in step 4).
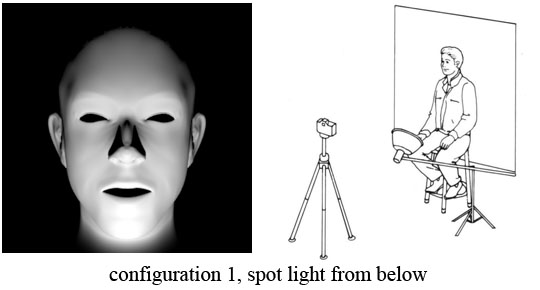
Configuration 1. Spotlight from below: First, we will move the spotlight so it points upward at the face from below. Open the lighting.pbrt scene file and find the description of the spotlight in the file. It should look like this:
LightSource "spot" "color I" [50 50 50] "point from" [0.5 0 4.7] "point to" [0 0 0] "float coneangle" [60]
As expected, the light is located behind the camera down the Z axis and slightly off to the right ("point from" field). It is pointed at the center of the scene ("point to") where the model is located. Now move the light so that it is pointed at the model from the position and orientation shown below. A simple change in lighting completely changes the mood of the portrait.
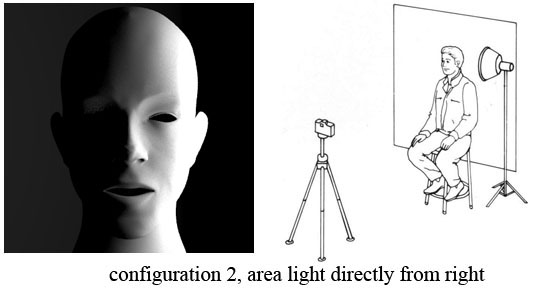
Configuration 2: Area light from right: The light from a pbrt spotlight originates from a single point in space. Light originating from a single point generates hard shadows that are objectionable in portraits. Area lights emit light from a large region in space, resulting in softer lighting of the face and the generation of software shadows. The pbrt scene file contains the following definition of an area light (commented out originally in the file):
AttributeBegin
  AreaLightSource "area" "color L" [10 10 10] "integer nsamples" [4]
# use camera coordinate system (optional)
  CoordSysTransform "camera"

# adjust light source position
  Translate 0 0 -2
  Rotate 90 1 0 0
Shape "disk" "float radius" [1.5]
Light from this source is emitted from a region given by a disk of radius 1.5. The luminance emitted by this light source is given by the value "L". Replace the spotlight from configuration 1 with this area light and produce an image similar to the one shown below.
You will notice an increase in rendering time when enabling the area light in the scene. This is a good time to discuss ways to speed up rendering to make the process of tweaking a scene go quickly. The simplest way of doing this is to decrease the size and quality of the rendered image. Notice that lighting.pbrt is set up to render 300x300 images. To render smaller images, change "xresolution" and "yresolution" in the Film defition in the lighting.pbrt file.
Film "image" "string filename" ["lighting.exr"]
        "integer xresolution" [300] "integer yresolution" [300]
Additionally, decreasing the number of samples (eye rays) that pbrt uses to compute each output pixel's value will also speed up rendering. The Sampler definition in lighting.pbrt instructs pbrt to sample each output pixel using two rays. We ask you to increase this value to 4 for your final hand in images, however while setting up your scenes you might wish to use only a single sample per pixel to minimize rendering costs.
Sampler "lowdiscrepancy" "integer pixelsamples" [2]
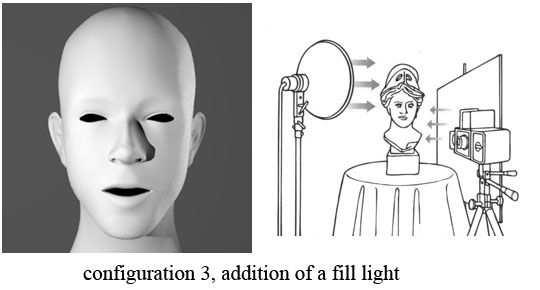
Configuration 3: Two light sources: Notice how the left side of the face is in shadow in configuration 2. In fact, it is so dark that no detail is visible at all. A photographer might use a additional lights to illuminate the subject more evenly. In this setup, a spotlight shines on the model at an angle from the left, and a reflecting surface is placed to right of the model to reflect light back onto the dark side of the face, resulting in more even illumination. This second source of lighting on the model is referred to as fill lighting. One way to approximate this effect in pbrt is to use two light sources. Illuminate the model using a spotlight from the position indicated in the illustration below. Then use a large area light on the right of the model to give the effect of fill lighting on the dark side of the face. Render a version of the scene without the fill lighting to oberve the visual difference.
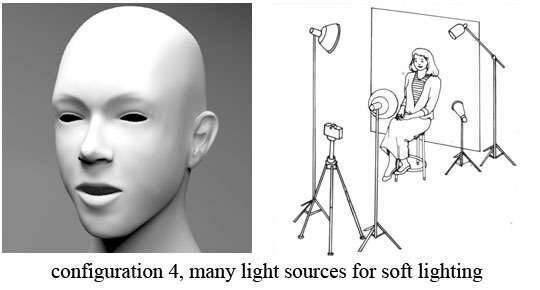
Configuration 4: Many light sources: In practice, many lights are used to illuminate the subject exactly to the photographer's preference. Try and adjust the lighting conditions to recreate the scene below where four light sources are used to create a very pleasing illumination across the model. Notice that in this example you will also need to move the position of the camera to view the model from a slightly different angle. Camera settings are defined by the following two lines in the scene file. The LookAt directive specifies the position of the camera in world space, the location the camrea is pointed at, and the "up" direction of the camera.
LookAt 0 0 4.5  0 0 0   0 1 0
Camera "perspective" "float fov" [22]
The following 4 images show the separate effect of the four light sources.
The main light is on the side of the face away from the camera.
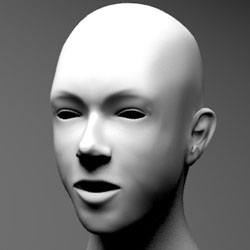
The fill light is close to the camera on the opposite side from the main light.
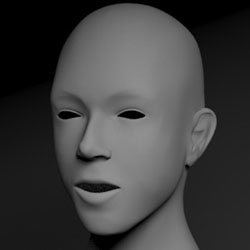
The accent light shines toward the upper part from the back of the subject. Normally, it is used to highlight texture of hair. "Unfortunately," our model is bald. ![]()
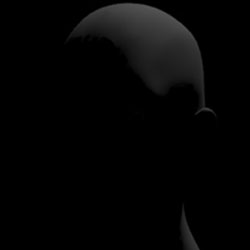
The background light separates the subject from the background. It is placed behind the subject and to one side, lighting toward the backdrop.
Step 4: Submission and Grading
Please try to do your best to mimic the lighting configurations in the example renderings, however we do not expect your images to be absolutely perfect matches. The important thing is that you become familiar with using pbrt and manipulating properties of the scene files. This assignment will be graded on a credit/no credit basis. Credit will be given if the example renderings are reproduced to reasonable accuracy and the assignment is submitted in accordance with the instructions below:
Your handin will be a zip file (please put your name in the filename: eg FirstnameLastname_A1.zip) consisting of 4 rendered images (converted to jpg format, see required rendering setting given below) and 4 pbrt scene files corresponding to the 4 lighting configurations discussed in step 3. Please email this zip file to the course staff at cs348b-spr0607-staff@lists.stanford.edu, do not post your final scene files on the course wiki. In addition to emailing us your images and scene files, please create a page on the course wiki briefly summarizing the process you took to reach the correct scene configurations (did you have any problems, how did you speed up the render-view results-render again process, etc?) and describe any additional experimentation with pbrt you performed on this assignment. This summary need only be a paragraph or two. Setup a link to your homework 1 wiki page from Homework1Assignments.
Please adhere to the following guidelines when rendering your final images:
- Render all final images at a resolution of 400x400, with 4 samples per each image output pixel, and 4 samples per each area light source in your scenes.
Please name your files for configuration X config_X.jpg and config_X.pbrt, that is, your handin should contain the following files.
- config_1.jpg -- your rendering of configuration 1
- config_1.pbrt -- scene file that produced config_1.jpg
- config_2.jpg
- config_2.pbrt
- config_3.jpg
- config_3.pbrt
- config_4.jpg
- config_4.pbrt
Final Words
We encourage you to experiment around further with pbrt over the course of this assignment. Of course, if you create beautiful images include them in your submission or post them on the wiki, we'd love to see them! Here are some additional things to try that might become useful to you later in the course:
- Disable shadowing in the rendered image
- Use a photon mapping surface integrator to model the inter-reflection of light among the surfaces of the head model.
- Appendix C of the pbrt textbook describes the pbrt scene file format in detail.
Questions? Please email cs348b-spr0607-staff@lists.stanford.edu
