CS178 Assignment 7 - Night and Color

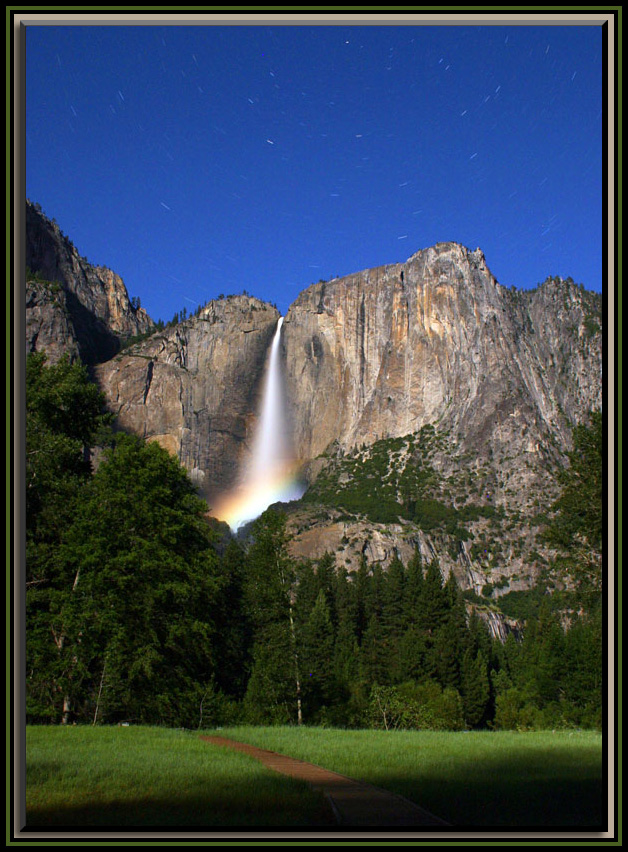
Yosemite at Night. Photo by Jesse Levinson.
Motivation
Taking photographs at night presents unique challenges. Exposure times must be very long, so hand-holding the camera is out of the question. However, with a steady place to rest the camera (which need not be a tripod), and a long exposure, the light gathering ability of your camera can greatly exceed the human eye, allowing you to capture a shot of something you could not normally see, such as a forest at night, a faraway galaxy, or even a rainbow cast by moonlight.
Requirements
- Requirement 1: An Outdoor Night Scene of
Nature
Head outside, find somewhere stable to rest your camera, and photograph a picturesque natural night scene. We want to see absolutely no motion blur due to camera movement in your shot. You may wish to use the self-timer mode on your camera to avoid the problem of moving the camera when you press the shutter button. As this is a night scene, your exposure time should be at least one or two seconds. For this nature requirement, you may want to find a landscape illuminated by the sky and/or moon and/or artificial lights, but the subject should be nature (and not artificial objects). It's okay if there is an incidental amount of manmade stuff in your scene, but your photograph should be all or almost all natural, and the subject should clearly be nature.
- Requirement 2: An Outdoor Night Scene of
Architecture
As in requirement 1, take a night photograph of at least one or two seconds exposure with absolutely no motion blur, but this time your subject should be architecture. Example subjects include bridges, city streets, buildings, cityscapes, etc. Reminder: your photo should be well exposed, so we can see detail in the buildings and other objects -- don't make it so dark that all we can see are the lights.
- Requirement 3: Painting with Light
Take a long-exposure photo in which you use a light source as if it were a painter's brush. You should move the light around to create the scene you want over the course of the exposure. You can do this by making a moving light source the subject as in our example, or by pointing the light at the parts of the scene you wish to be illuminated over the course of the exposure. For example, you may want to walk around in your scene during the exposure with a hand-held camera flash, firing it in places you would like to be illuminated. In general, you may use any light source you have available to you: bike lights, LEDs, candles, flashlights, or even your cell phone screen will all cast light into the scene in different ways. Be creative!
- Requirement 4: Light and Color
Find a colored object and a strongly colored light source (such as an LED) such that the color of the object as photographed by your digital camera looks dramatically different under that light source versus under normal lighting. Submit two photographs demonstrating this effect - one under normal lighting and one under colored lighting. Include in each photograph a white (neutral-colored) object as a comparison.To make the two photographs comparable, turn off auto white balance on your camera. In your comments, describe the object and the colored light. Remember that this effect will depend not only on the apparent colors of the objects and light, but on their underlying spectra. Since you don't know these spectra, you may have to experiment a bit to find a good example. The effect will be strongest when using a light source with a narrow spectrum, such as the sodium lamps you find in parking lots or the LEDs on your electronics.
- Requirement 5: Color as a pictorial
Take a photo that is primarily monochromatic (i.e. grayscale or a single desaturated color like grayish-brown) that has one or more elements sharing a single common bright color. For example, a black-and-white photo with three red apples. You can achieve the effect with any combination of setup and Photoshop, meaning that your original photo doesn't have to satisfy the requirement as long as you use Photoshop to selectively saturate everything that's not your color accent. Be creative here, and have fun with this one! Make sure you state in your comments how you set up the shot and what, if anything, you did in Photoshop to achieve the effect. (You don't need to upload the pre-Photoshop shot, and again, you don't necessarily even have to use Photoshop if you can achieve the effect without it.)
Upload your photos and add comments.
Upload your photos using the Google+ account you created in the first week to a public Google+ album titled "CS178 Assignment 7 - Night and Color" and submit your assignment on Vela. Write at least two short paragraphs below each of your photos explaining how you arranged the scene, how you took the photo, what relevant camera settings you used and why, any image processing done to the photograph afterwards, and most importantly, which requirement the photo covers.
Example Solution
As usual, we've posted an example solution to this assignment to let you know what we expect. For additional inspiration, you may want to peruse the best CS178 photographs (as selected by the TA's and instructor) from 2009, 2010, 2011, 2012 and 2013. However, you do not need to meet the assignment requirements in the same way as these solutions do - in fact, you should challenge yourself to come up with creative, unique compositions. There are plenty of possibilities out there. Surprise us!Please remember that the photographs that you submit for each assignment must be taken by you specifically for this course. Do not reuse old photographs that you may have laying around, even if they perfectly meet one of the requirements!
If you have questions or comments about the photos we used in the example solution, feel free to add them as comments below the corresponding photograph in Picasa Web, or to email us.
Practice problems
Here are a few more questions on color theory to help you better understand the topic. There are also some questions on lighting, the topic for this week. As background for question 1, it will help to read over this paper about color vision in horses: paper (click on "PDF" under Full Text to read the paper). You don't need to read it closely, and there are lots of terms from biology which we don't expect you to know, but you should understand the figures.
Horses are dichromats. They have two different types of color receptors with two different sensitivity functions. Roughly speaking, Figure 1 shows the spectral sensitivity of horses for one type of receptor, Figure 2 shows spectral sensitivity for both types of receptors, Figure 3 is a simulation of what Newton's color wheel looks like to a horse, and Figure 4 is a simulation of what some real scenes look like to a horse. For more intuition, you may also want to view the CS178 applet that shows the locus of spectral colors for various visual systems, including that of the horse.
- Problem 1a. True or False: Any two objects that appear
the same color to horses will also appear the same to humans.
- Problem 1b. True or False: Any two objects that appear
the same color to humans (metamers) will also appear the same to
horses.
- Problem 1c. True or False: Ignoring brightness, a horse
can only see two different colors, while a human can see an
infinite number of colors.
- Problem 1d. True or False: If you take a color
photograph of a scene, and show it to a horse on your laptop
screen, will it look like the real scene to the horse? That is,
for the horse, will the colors of different objects in the
photograph appear to match the colors of those objects in
reality?
- Problem 2: Camera Color Sensitivity. The pixels in most
digital cameras are covered with red, green, or blue filters,
arranged in some pattern. If one replaced some filters of each
color with yellow filters, what would happen? (check all the
apply):
- a) The color measurement space of the camera, akin to the color response space of an animal, would change from three-dimensional to four-dimensional
- b) The camera would be able to see pure wavelengths not lying on the visible spectrum.
- c) The camera would be more sensitive to dim yellow objects.
- d) The camera's ability to capture color would not be affected.
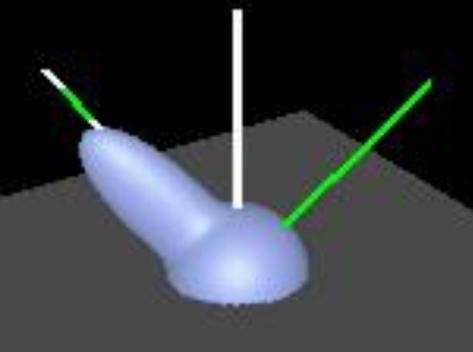
- Problem 3: Goniometric diagrams. Which statement best describes the material with the goniometric diagram shown below? The vertical white line represents the normal vector, and the line on the right side of the normal vector represents the direction of incoming light.

- a) slightly diffuse with a specular highlight
- b) a perfect mirror
- c) completely diffuse
- d) retroreflective
The peak in the direction of reflection indicates a specular material. The lobe at the bottom is from diffuse reflection in all directions. A perfect mirror would have no diffuse reflections, and a completely diffuse material would have no specular peak. Retroreflective materials would reflect light back along the direction of the light source.
- Problem 4: Flash. Your flash exposes your subject correctly at 10 ft with an aperture of f/16. To maintain this correct exposure using the same flash, you should use an aperture of ________ if your subject is 20 ft away. Circle the best answer.
- a) f/4
- b) f/8
- c) f/16
- d) f/22
- Problem 5: Illumination. True or False: If you point a camera at a uniformly illuminated white reflector card that fills the field of view, if you move the camera closer to the card without changing its exposure, the image brightens.
False. While the solid angle above each point on the card that is subtended by a pixel in the camera increases (in fact quadratically) when you move the camera closer to the card, the number of points contained in that portion of the card seen by each pixel decreases (also quadratically). These factors cancel, and there is no change in exposure.
- Problem 6: Additive vs. Subtractive Color. True or
False: Since printers operate in the subtractive color regime,
they must use the CMYK primaries.
Peer Grading
You should follow the same rubric as the previous assignments.
Due Date
Assignment Deadline: 11:59PM, Sunday, May 25, 2014Late Deadline: 11:59PM, Tuesday, May 27, 2014
Review Deadline: 11:59PM, Sunday, June 1, 2014
Assignments are generally due on Sunday at midnight at the end of the week in which they're assigned. This leaves you free to start thinking about the next assignment during your next section. Sometimes lateness is unavoidable. In such circumstances, be sure to read the lateness policy from the course outline, or contact your TA.
© 2009-2014 Marc Levoy, Andrew Adams, and Jesse Levinson