


By Dale Neal
The computer monitor has a very limited range of luminances that it can display. This causes problems first for high contrast images, where a lot of different luminances may be displayed as the same, but also for images with areas of high luminance which should be displayed as much brighter than the monitor can handle. Adding glare to the image attempts to combat that by allowing variance among intensities that are greater than what the monitor can display, as well as tricking the human eye into thinking that some areas of an image are actually brighter than they really are without incorrectly adding any luminance to the image.
The bulk of what I have done on this project has been based upon the methods described by Spencer, Shirley, Zimmerman, and Greenberg in Physically-based glare effects for digital images. This paper outlines first how glare works internally to the eye and then describes a method to mimic that in rendering.
Glare occurs entirely internally to the eye, and there are two main types of glare effects. The first is the corona, which forms the fuzzy glow you see around a light at night, or the rays which seem to shoot out from the light of the sun. The second is the lenticular halo, which is only seen when the pupils are dilated enough and is a color banded halo which is usually visible surrounding the corona.
An interesting thing about glare is that because it happens internally to the eye, the angle subtended by the glare upon the retina is identical for a distant light as well as a close light, so the origin of light is unnecessary when calculating glare. Thus, in lrt, glare can be implemented as a tonemap which uses 2D filters to represent point source functions from a source pixel.
The first assumption I made was that the angle subtended by a pixel was constant for any given scene. While this is certainly not always the case (and in fact, it's rarely the case), the small differences in angle are not important enough to warrant the large amount of calculation that would be required to get it correct. Operating under this assumption, a single set of filters can be created for a whole scene.
The easiest filter to make is that of the corona. The Spencer paper goes over a lot of research into equations to accurately mimic the corona and the lenticular halo. So that no light is introduced or removed from the scene, it is important that any PSF used must integrate to 1 over a 90 degree arc. Spencer provides us with a weighted average of functions which represents a high concentration of light in the center and then quickly fading out as you leave the center of the filter. Because wavelength is not an issue this filter can be just an array of doubles.
The lenticular halo, on the other hand is a little more difficult because it is a function of wavelength as well as just angle. Ideally, I would have a filter for each wavelength possible in a spectral power distribution, but the creation and applicaton of such a set of filters is too prohibitive to warrant its use. Instead I have an X, Y, and Z filter. This is technically incorrect because it would map a mixture and a pure light to the same glare effect if they shared the same XYZ representation, but it is correct enough for my purposes.
For both of these filters, it is possible for the PSFs to change rapidly. Most noticably, the PSF for the corona can change by orders of magnitude within the span of a single pixel. To account for this, we have to sample the PSF at a large number of points within a pixel and average it. We also have to calculate the lenticular halo filters by combining the outputs from a bunch of different wavelengths across the visible spectrum.
Unfortunately, at this point, the calculation of these filters became prohibitively large for filters larger than 50x50 pixels and took much longer than rendering a simple image and applying the filters combined. To combat this, I lowered the sample rate in the lenticular halo filters because it does not change as rapidly, and I also lowered the number of wavelengths to sample. Next, In the corona calculation, I checked the ratio of the PSF at the center of a pixel versus at the edge, and if the ratio was close enough to one, I drastically reduced the number of samples taken. Lastly, because both filters are 8-way symmetrical, I can get a factor of 8 speedup by just calculating 1/8th of the filter and then just copying the values. After these optimizations, a 150x150 pixel filter can be calculated on my machine in about 10 seconds. I have found this to be an acceptable size for most glare processing.
Next we need to create streak filters. When you look at a bright light, it appears that individual streaks are coming out of it, and these streaks are what make a rendered glare appear most believable. To do this, we draw a number of radial lines in a filter with random angle and random intensity. I have found numbers of lines between 128 and 256 to appear most believable. To preserve correctness, we must then go through the filter and make sure that both globally and locally the values average to one.
For speed, I apply the streak filters to the corona and halo filters before even processing the image. The streak filter actually has an interesting and desirable effect upon the other filters, most noticably the corona filter. Prior to using the streak filters, the corona filter appeared to fade so quickly that its application gave the appearance more of blur than of glare. But because the radial lines are far between as one leaves the center of the streak buffer, the intensity of each streak is increased the further they are from the center. The creates the effect of focusing the light in the corona that is further away from the source. It makes the corona much more visible and much more believable while still preserving correctness.
Now for the actual application of the filters. The naive implementation would apply these filters to each pixel in the image, and indeed my first implementation did just this. This was unbearably slow, even with a filter as small as 20x20, and not only that, but it blurred the image noticably. This is about when I notice a subtle point in the Spencer paper that had eluded me the first several times I read it. Because the viewer of the images is human, their eyes will apply glare to the lumanences they see. Thus, by applying glare to every pixel, the viewer gets the effect of double-glare, causing blurryness.
Instead, we realize that the entire point of adding glare to an image is to create the glare that the viewer _should_ see, were the monitor able to display higher luminences. Thus, we only must apply glare to the pixels whose luminance is greater than what the monitor can display, and even then we only apply the glare to the difference between these two luminance values. This simple change makes a speedup of hundreds to thousands of times, depending on how much glare there is in the image.
One problem I ran into while working on this, though, was how lrt handles tonemaps. Because a tomemap works with luminance values, lrt pre-multiplies in 683 into all of the XYZ values before passing them to the tonemap. Then, after the tonemap has mapped the pixels, their values are divided by maxDisplayY (100.0f). This means that if you have a tonemap that does absolutely nothing, the pixel values will come out to be 6.83 times as bright as if you didn't have a tonemap at all.
My first solution to this problem was to divide all the incoming values by 6.83 to compensate because it is really annoying to have to scale all of the lights in every scene I work with. Of course, if I forgot to scale the lights when I applied my glare, the entire image would be glare and it would take half an hour to render. I wanted the same lighting to work whether or not I was using my tonemap. This seemed like such a hack, though, and I wanted something that worked better.
After some thinking, I came up with a general plan that would solve not only that problem but another one as well. When looking at a car headlight during the day, little to no glare is seen because your eye is adjusted to the luminances of daylight. But at night, a large amount of glare is seen because your pupils are dilated due to the scarcity of light. I decided to implement a mapping that would look at the amount of light in the scene and then map the pixels accordingly before applying glare.
I re-read the section in the lrt manual on tonemapping, and I liked the qualities ascribed to the logarithmic based scalings, such as nonlinear.cc and contrast.cc. I tried both of these, but they had the bad effect that they created huge amounts of glare for darker images. Because they are made to be unaffected by small amounts of bright light, they have trouble distinguishing between differing brighness in small patches of light in a dark image. This certainly wouldn't do.
Instead, I tried to guess at how the human eye might work. From what I know, it contracts and dilates based upon how much light it recieves. Thus, I wrote a simple mapping that scaled everything so that the average luminance in the image was equal to the displayAdaptation amount. This of course had the problem that for images with a small amount of light, that light was completely blown out so that it appeared to be this huge supernova once glare was applied. This would be the equivalent of your pupil being able to dilate to several inches in diameter, and of course this would never do. To put a cap on how much things could be scaled, I treated every pixel so that it had a minimum luminence of 1. I experimented with different numbers, but 1 appears to be the best.
degreesubtended - the number of degrees subtended by a single pixel in the image
lightcondition - 0 for photopic (daytime), 1 for mesopic (dusk), 2 for scotopic (night)
premap - whether or not to use the premap capabilities
First, the cornell box images without any glare:
Now, the same images, but rendered with glare. Note how the light appears to occlude objects which are clearly in front of it.


How bright are these lights? I can't tell...

Ahh, there we go. Now I can see it (scotopic)!
The same scene, mesopic:

Now, photopic:

A familiar scene:

A familiar scene with glare. Bet you didn't know how bright it was!

Now lets see what happens when we don't use the premap. Ouch, my eyes!

A headlight in the day... not so bright:

The same headlight at night... now it's bright:

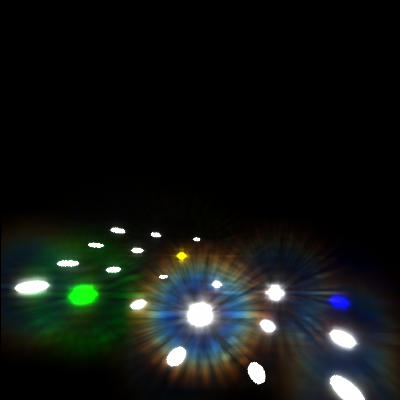
More random images:

This one was the first working glare image I rendered!


You don't want to know how goddam long it took to render this next one
