Results
I was pretty happy with the test results, so I decided to start
measuring some of the climbs in the area. These numbers should be
accurate within about a 2% grade or so. Remember that these
measurements were taken over a distance of only a meter, and so
do not necessarily represent sustained climbs of these grades.
However, I tried to avoid steep sections that were less than 20
meters long, such as the inside turn of a switchback.
| Street | Max. Grade | Avg. Grade | City | Address | Altimeter Grade |
|---|---|---|---|---|---|
| Alameda de las Pulgas | 20% | 8% | San Mateo | 3704 |
|
| Ascension Dr. & Anacapa Dr. | 17% | 10% | Los Altos Hills | 26390 Anacapa |
|
| Bohlman & On Orbit | 22% | 9% | Saratoga | 15555 On Orbit |
|
| Bunker Hill Drive | 16% | 9% | San Mateo | 2248 |
|
| Club Drive | 17% | 9% | San Carlos | 296 |
|
| Crestview Drive | 16% | 8% | San Carlos | 1237 |
|
| Golden Oak Drive (east side) | 19% | 10% | Portola Valley | 430 |
|
| Golden Oak Drive (west side) | 15% | 8% | Portola Valley | - |
|
| Joaquin Road | 20% | 15% | Portola Valley | 60 |
|
| Kings Mountain Road | 14% | 7% | Woodside | - |
|
| La Barranca Road | 16% | 7% | Los Altos Hills | - |
|
| Los Trancos Road | 19% | 4% | Portola Valley | - |
|
| Melendy Drive | 17% | 9% | San Carlos | 2770 |
|
| Montebello Road | 16% | 7% | Cupertino | - |
|
| MoUnt Diablo (South Gate) | 16% | 5.3% | Contra Costa County | - |
|
| Old La Honda Road | 15% | 7.3% | Portola Valley | - |
|
| Patrol Road | 18% | 10% | Woodside | 725 |
|
| Quinnhill | 19% | 16% | Los Altos | 317 |
|
| Ramona Road | 17% | 11% | Portola Valley | - |
|
| Redwood Gulch Road | 18% | 10% | Saratoga | - |
|
| Summit Springs | 23% | 13% | Woodside | 555 |
|
| Sweeney Ridge | 17% | 7% | Pacifica | - |
|
| Tollgate Road | 17% | 10% | Saratoga | 21196 |
|
| Viscaino Road (east side) | 18% | 11% | Los Altos Hills | 12831 |
|
| Viscaino Road (west side) | 20% | 12% | Los Altos Hills | - |
|
| Vista Verde Way | 17% | 11% | Portola Valley | - |
|
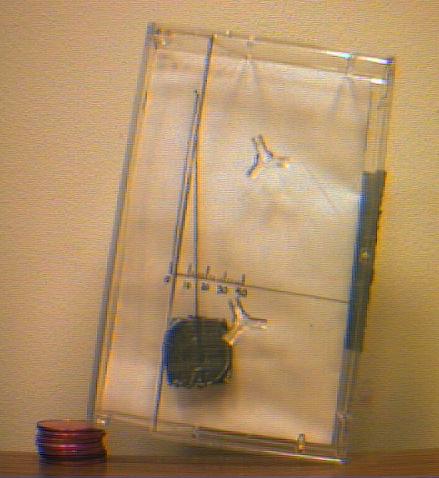
My first gradiometer, sitting on a stack of 7 pennies. The base is 67mm long, and the stack is 10mm high, giving a grade of 15%, which matches fairly closely to the reading on the gradiometer.
Inspired by the Low-Key Hillclimbs and Western Wheelers' list of southern peninsula climbs, I wanted to see if I could make a cheap, reasonably accurate gradiometer that would be small enough to be easily carried on a bike ride. This is what I came up with. It consists of an audio tape case (with the two "prongs" inside broken off). Inside is a paper card, with the scale drawn on it. A penny hangs by a thread. The top of the thread goes through a pinhole in the card to the backside, where it is secured with tape. The card is glued to the inside of the case, so that it won't move.
Before I glued the card in place, I calibrated it so that, when the case is sitting on the top tube of my road bike on flat ground, it reads 0% grade. (My top tube slopes downward at about a 0.5% grade, so I had to rotate the card inside the case slightly). Thus, the gradiometer uses the bike as a base. It measures the grade over a distance of 98cm (my wheelbase), instead of the 6.7cm base of the case. This helps avoid errors due to bumpy asphalt.
Build Your Own Gradiometer
My most recent gradiometers used a CD case instead of a cassette
case. You can just remove (or cut short) the black plastic piece inside
the case. It's easy to make your own... just print out
this postscript file (or
this acrobat (.pdf) file ). Then all you need
is a scissors, coin, needle, thread, CD case, tape, and glue (I prefer hot
glue, but anything that sticks to plastic should work).
Tape the coin to one end of the thread. You'll want to completely encase the coin in tape, so it doesn't make so much noise when it rattles around in your back pocket. Then use the needle to poke the thread through the upper left corner of the scale. If your paper is light, you can reinforce it with a layer of tape first, and stick the needle through both the paper and the tape. Then tape the end of the thread to the back of the paper. Make sure the thread is long enough that the coin hangs below the scale, but short enough that the coin doesn't hit the bottom of the CD case.
Glue the paper scale inside the CD case. To calibrate it, you can either figure out the exact placement before you glue it, or you can add layers of tape to one end of the base of the gradiometer until it reads 0% on level ground.
Calibration Tests
I ran some tests to see how accurately the gradiometer could measure
a known grade. So after calibrating the gradiometer for level ground,
I started stacking books under the front wheel. I recorded the readings
from my gradiometer. When I was done taking readings, I measured the
wheelbase of my bike, and the thickness of each of the books. From
this, I computed the actual grade, for comparison. Here's the results:
| Wheelbase | Rise | Gradiometer Reading | Calculated Grade |
|---|---|---|---|
| 97.8cm | 3.6cm | 4% | 3.7% |
| 97.8cm | 8.2cm | 8% | 8.4% |
| 97.8cm | 14.5cm | 15% | 14.9% |
| 97.8cm | 19.9cm | 21% | 20.5% |
Note on Altitude
All of the altitudes (and "feet climbed") on this page are from my
much-abused Avocet 50 altimeter. The altitudes are intended to give
a rough idea of elevation gained. I haven't done any formal tests, but
I think that the altitude readings are within about 10% (accuracy),
+/- 100 feet (due to weather).
Links to Other Bay Area Grade Pages