Video Capture
This program is used to capture audio and video to a file from a window (or the entire desktop.) Its main use is to provide a free and high quality capture program for tutorial sessions like those you might see at ASP.net; it can also capture Flash videos such as Hulu or YouTube, or video game sessions.
Advantages:- Quality — The H.264 codec is used. The compression quality of this codec is very high and the file size is reasonable. This is the same codec used by Blu-ray Disc, YouTube, and iTunes.
- Lightweight — The application is two files that are about 100k in size. It does not install itself and can be trivially moved or deleted.
- Audio — If desired, audio can be captured. This audio can come from either the current speaker output or an input microphone (but not both.)
- Configurable — The window to capture from, the max data rate, the frame rate, and the audio input device can all be easily modified.
Disadvantages:
- Compression Rate — H.264 is a very compute intensive codec. Some systems may not be able to compress at a very high framerate or may notice their system slowing down. The capture method used is also highly non-invasive; this makes it slower than invasive approaches such as Fraps, which attach to the address space of the target application and intercept the video feed earlier in the pipeline. I also have an invasive video capture application I have written based on my D3D9 Interceptor framework but it is not as trivial to use.
- Windows 7 Only — I did not write my own H.264 codec and use one that is part of the Windows Media Foundation API. Unfortunately this codec only ships with Windows 7 and the application will not launch on earlier versions of the operating system.
- Fixed Codec — The codec cannot be changed to one that is either lossless or compresses faster. Also, the largest resolution supported by the H.264 specification is 1920x1080; any attempt to capture a window larger than this in either dimension will fail.
- Window Resolution — Once the screen is captured by the application, it is no longer resident on the graphics card and cannot be efficiently resized. This means that the resolution of the captured video file will always match the resolution of the input window exactly.
Overview
The UI for this app is relatively straightforward. At a high level, you select the window you want to capture and click the record button. Click the stop button to stop recording. The capture file is saved to the same directory as the application; the name is the timestamp at the time recording started and the extension is ".mp4". The UI is shown below:
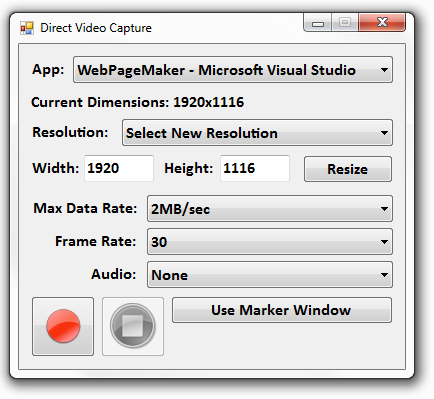
- App — The window that you want to capture. Only unminimized windows are shown in this list. The target window must remain topmost; if you drag another window over it, that window will be recorded instead. Select "Whole Screen" to capture the entire desktop. If you have multiple monitors, only windows on the primary monitor will be captured.
- Current Dimensions — The current dimensions of the window selected in the "App" field. This is also the resolution that the video will be captured at (rounded up to the next multiple of 4.)
- Resolution — This is a fast way to choose between a common set of resolutions. Modifying this field will not modify the capture resolution (which is always locked to the resolution of the target window,) it will just modify the Width and Height text fields. Common resolutions are 480p, 720p, and 1080p.
- Width, Height, and Resize — When you press the resize button, this program will attempt to resize the window selected under the "App" field to the given width and height. Some windows cannot be resized, or have minimum and maximum possible sizes, in which case this call will do nothing.
- Max Data Rate — The maximum number of bytes that can be written to the target file per second. In practice, the output file will usually be much smaller because the scene is not constantly changing.
- Frame Rate — The number of frames per second in the captured video. This is the target rate, but because screen capture and compression takes time, the application may be unable to sustain this rate in which case some frames will be skipped.
- Audio — The audio device to capture from or "None" if no audio is desired. If you want to capture what the current speakers are playing, you will need to enable "Wave Out Mix" or "Stereo Mix" so that it appears in this list; see this page for instructions on how to do this.
- Use Marker Window — This creates a simple resizable window that can be used to easily select a region on the screen to capture from. If other windows are then moved over this marker window, the region where they overlap the marker window will be recorded.
- Start and Stop Recording — These control when to start and stop recording. The recordings are not concatenated; a new capture file is created everytime the "Start Recording" button is pressed.
Sample Capture
Here is a sample capture from my computer on Starcraft 2 at 1024x720, 25fps. The non-invasive methods used by the screen capture process make the resulting video slightly choppy. Video games are also the hardest case for video capture apps, since games already consume large portions of the available CPU and GPU processing power and memory bandwidth, and the capture app must compete with the game for these resources. Furthermore, the screen is typically changing very rapidly which increases computation time and the amount of data that needs to be written. Performance is considerably better on less intensive desktop applications, nevertheless, even for games the quality is usually more that sufficient to follow the action. To view mp4 players in a browser you will need a plugin like Quicktime; the mp4 can also be downloaded directly below.
Download
A Windows 7 executable of the application can be downloaded here:
Code
The code is divided into two sections, the simple C# application that contains the GUI and the C++ backend that is a DLL providing an interface to the audio and video capture routines.
C# Application
VideoCaptureApp Code Listing
Total lines of code: 894
C++ DLL
This code is all based off my BaseCode. Specifically you will need the contents of Includes.zip on your include path, Libraries.zip on your library path, and DLLs.zip on your system path.
VideoCaptureDLL Code Listing
Total lines of code: 1033